
Photo by the Author
# Introduction
Remember when building a full-stack application required expensive cloud credits, expensive API keys, and a team of developers? Those days are officially over. By 2026, developers can build, deploy, and measure a production-ready application using nothing but free tools, including major language models (LLMs) that empowers its faculty.
The landscape has changed dramatically. Open source models are now challenging their commercial counterparts. AI coding assistants have grown from simple auto-completion tools to full-fledged coding agents that can design every feature. And perhaps most importantly, you can use high-quality models locally or through free categories without spending a dime.
In this comprehensive article, we will build a real-world application – a summary of the AI conference notes. Users will upload voice recordings, and our app will transcribe them, extract key points and action items, and display everything on a clean dashboard, all using completely free tools.
Whether you're a student, a bootcamp student, or an experienced developer looking to prototype an idea, this tutorial will show you how to use the free AI tools available. Start by understanding why free LLMs are working so well today.
# Understanding Why Free Larger Language Models Are Working Now
Just two years ago, building an AI-powered application meant budgeting for OpenAI API credits or hiring expensive GPU instances. The economy has changed.
The gap between commercial and open source LLMs has almost disappeared. The models are similar GLM-4.7-Flash from Zipu AI shows that open source can achieve modern functionality while being completely free to use. Likewise, LFM2-2.6B-Transcript It is specially designed for assembly compression and works perfectly on a device with cloud-level quality.
What this means for you is that you are no longer locked into a single vendor. If one model doesn't work for your use case, you can switch to another without changing your infrastructure.
// Joining the Self-Hosted Movement
There is a growing preference for models that use local AI on your hardware instead of sending data to the cloud. This is not just about cost; it's about privacy, latency, and control. With tools like Ollama again LM Studioyou can use powerful models on a laptop.
// Adopting a “Bring Your Own Key” Model.
A new class of tools has emerged: open source applications that are free but require you to provide your API keys. This gives you ultimate flexibility. You can use Google Gemini API (which offers hundreds of free applications every day) or uses completely local models without ongoing costs.
# Choosing your free artificial intelligence stack
Sorting out the best free options for each part of our app involves choosing tools that balance functionality and ease of use.
// Transcription Layers: Speech-to-Text
To convert audio to text, we have excellent free speech-to-text (STT) tools.
| A tool | Kind of | Free category | It's very good |
|---|---|---|---|
| OpenAI Whisper | Open source model | Unlimited (automation) | To be precise, many languages |
| Whisper.cpp | A privacy-focused implementation | Unlimited (open source) | Conditions affecting privacy |
| Gemini API | Cloud API | 60 requests/minute | Rapid prototyping |
For our project, we will use Whisperwhich you can use locally or with free hosting options. It supports more than 100 languages and produces high quality documents.
// Summarizing and Analyzing: The Big Language Model
This is where you can choose the most. All options below are completely free:
| Model | Provider | Kind of | Expertise |
|---|---|---|---|
| GLM-4.7-Flash | ZIP AI | Cloud (free API) | General purpose, coding |
| LFM2-2.6B-Transcript | Liquid AI | Location/device | Summary of the meeting |
| Gemini 1.5 Flash | Cloud API | Long content, free category | |
| GPT-OSS Swallow | Tokyo Tech | Local/self-hosted | Japanese/English description |
For our summary of the meeting, i LFM2-2.6B-Transcript the model is particularly interesting; it was literally trained for this use case and runs on less than 3GB of RAM.
// Accelerating Development: Intelligent Code Assistants
Before we write a single line of code, consider the tools that help us build efficiently within an integrated development environment (IDE):
| A tool | Free category | Kind of | Key Feature |
|---|---|---|---|
| Comet | Full for free | VS code extension | SPEC-driven, multi-agent |
| The codeium | Unlimited free | An IDE extension | 70+ languages, fast guess |
| Cline | Free (BYOK) | VS code extension | Automatic file sorting |
| Go ahead | Full open source | An IDE extension | Works with any LLM |
| bolt.diy | You're holding on to yourself | A browser IDE | Full stack generation |
Our recommendation: For this project, we will use Codeium with its unlimited free tier and speed, and we will keep Qhubeka as a backup when we need to switch between different LLM providers.
// Reviewing the Traditional Free Stack
- Front: We responded (free and open source)
- Background: FastAPI (Python, free)
- Website: SQLite (file based, no server required)
- Shipping: Vercel (open free category) + Give (back)
# Reviewing the Project Plan
To specify the application:
- User uploads an audio file (meeting recording, voice memo, lecture)
- The backend receives the file and passes it to Whisper for writing
- The transcript is sent to the LLM for condensing
- The LLM issues key points for discussion, action items, and decisions
- The results are stored in SQLite
- The user sees a clean dashboard with text, summary, and action items
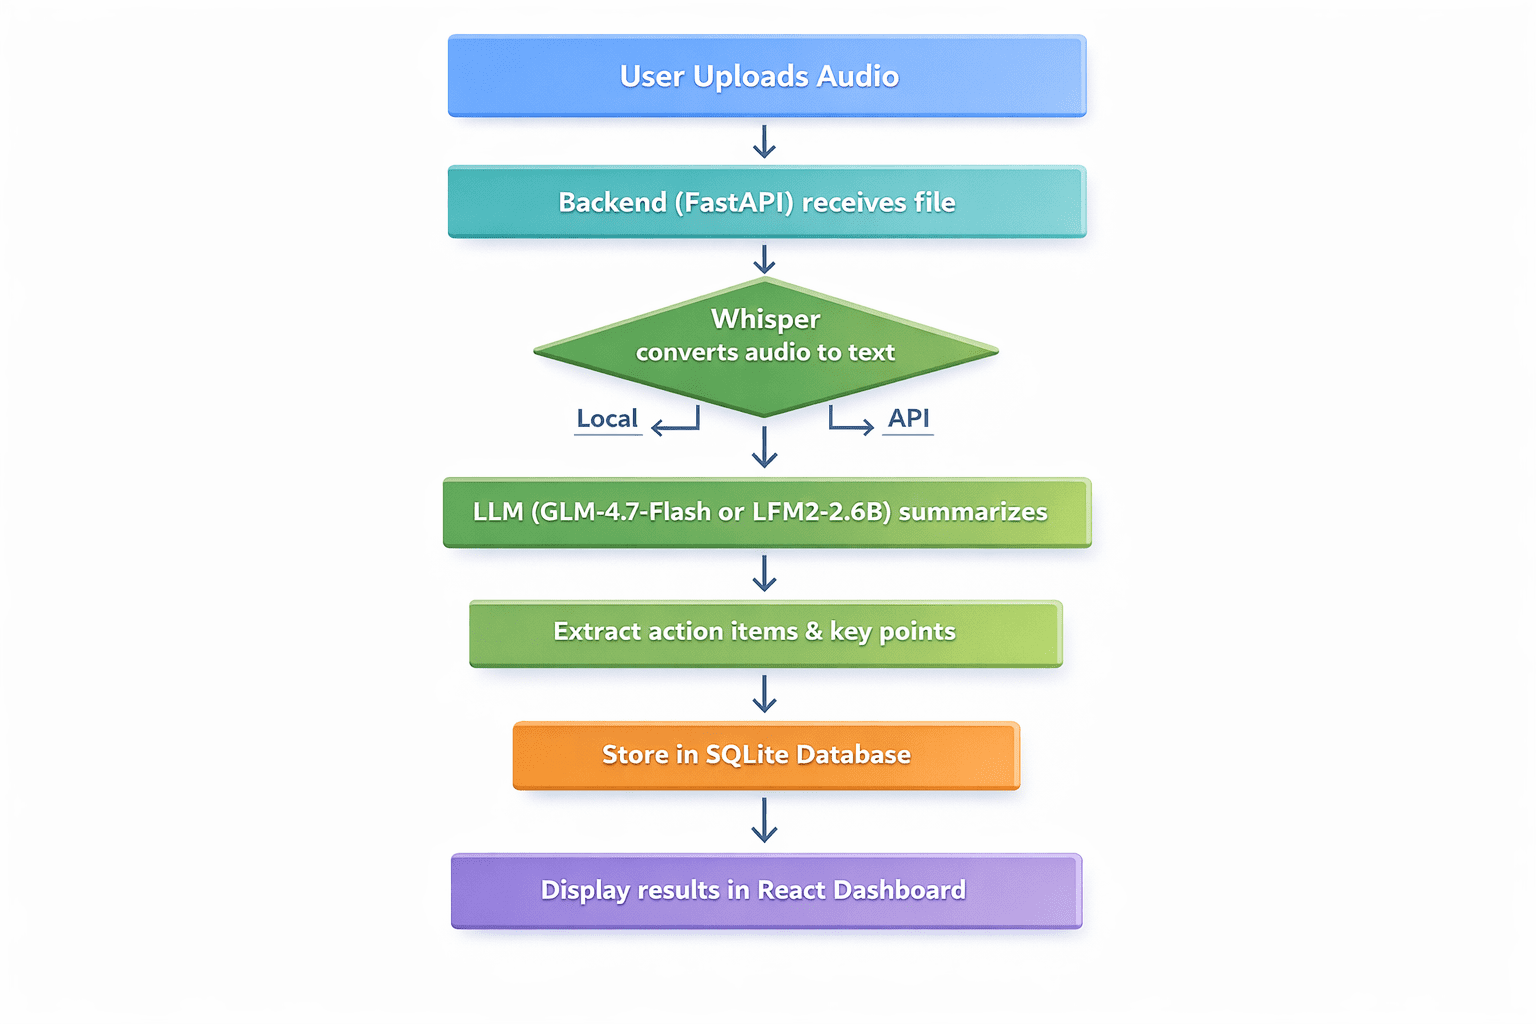
Diagram of a flow chart with seven sequential steps | Photo by the Author
// What is required
- Python 3.9+ is included
- Node.js and npm are included
- Basic familiarity with Python and React
- Code editor (VS Code is recommended)
// Step 1: Setting Up Backend with FastAPI
First, create our project directory and set the virtual environment:
mkdir meeting-summarizer
cd meeting-summarizer
python -m venv venv
Activate virtual environment:
# On Windows
venvScriptsactivate

# On Linux/macOS
source venv/bin/activate
Install the required packages:
pip install fastapi uvicorn python-multipart openai-whisper transformers torch openaiNow, create a file of main.py file for our FastAPI application and add this code:
from fastapi import FastAPI, File, UploadFile, HTTPException
from fastapi.middleware.cors import CORSMiddleware
import whisper
import sqlite3
import json
import os
from datetime import datetime

app = FastAPI()

# Enable CORS for React frontend
app.add_middleware(
    CORSMiddleware,
    allow_origins=["
    allow_methods=["*"],
    allow_headers=["*"],
)

# Initialize Whisper model - using "tiny" for faster CPU processing
print("Loading Whisper model (tiny)...")
model = whisper.load_model("tiny")
print("Whisper model loaded!")

# Database setup
def init_db():
    conn = sqlite3.connect('meetings.db')
    c = conn.cursor()
    c.execute('''CREATE TABLE IF NOT EXISTS meetings
                 (id INTEGER PRIMARY KEY AUTOINCREMENT,
                  filename TEXT,
                  transcript TEXT,
                  summary TEXT,
                  action_items TEXT,
                  created_at TIMESTAMP)''')
    conn.commit()
    conn.close()

init_db()

async def summarize_with_llm(transcript: str) -> dict:
    """Placeholder for LLM summarization logic"""
    # This will be implemented in Step 2
    return {"summary": "Summary pending...", "action_items": []}

@app.post("/upload")
async def upload_audio(file: UploadFile = File(...)):
    file_path = f"temp_{file.filename}"
    with open(file_path, "wb") as buffer:
        content = await file.read()
        buffer.write(content)

    try:
        # Step 1: Transcribe with Whisper
        result = model.transcribe(file_path, fp16=False)
        transcript = result["text"]

        # Step 2: Summarize (To be filled in Step 2)
        summary_result = await summarize_with_llm(transcript)

        # Step 3: Save to database
        conn = sqlite3.connect('meetings.db')
        c = conn.cursor()
        c.execute(
            "INSERT INTO meetings (filename, transcript, summary, action_items, created_at) VALUES (?, ?, ?, ?, ?)",
            (file.filename, transcript, summary_result["summary"],
             json.dumps(summary_result["action_items"]), datetime.now())
        )
        conn.commit()
        meeting_id = c.lastrowid
        conn.close()

        os.remove(file_path)
        return {
            "id": meeting_id,
            "transcript": transcript,
            "summary": summary_result["summary"],
            "action_items": summary_result["action_items"]
        }
    except Exception as e:
        if os.path.exists(file_path):
            os.remove(file_path)
        raise HTTPException(status_code=500, detail=str(e))
// Step 2: Assembling the Free Large Language Model
Now, let's use the summarize_with_llm() work. We will show two methods:
Option A: Using GLM-4.7-Flash API (Cloud, Free)
from openai import OpenAI

async def summarize_with_llm(transcript: str) -> dict:
    client = OpenAI(api_key="YOUR_FREE_ZHIPU_KEY", base_url="

    response = client.chat.completions.create(
        model="glm-4-flash",
        messages=[
            {"role": "system", "content": "Summarize the following meeting transcript and extract action items in JSON format."},
            {"role": "user", "content": transcript}
        ],
        response_format={"type": "json_object"}
    )

    return json.loads(response.choices[0].message.content)
Option B: Using Local LFM2-2.6B-Transcript (Local, Completely Free)
from transformers import AutoModelForCausalLM, AutoTokenizer
import torch

async def summarize_with_llm_local(transcript):
    model_name = "LiquidAI/LFM2-2.6B-Transcript"
    tokenizer = AutoTokenizer.from_pretrained(model_name)
    model = AutoModelForCausalLM.from_pretrained(
        model_name,
        torch_dtype=torch.float16,
        device_map="auto"
    )

    prompt = f"Analyze this transcript and provide a summary and action items:nn{transcript}"
    inputs = tokenizer(prompt, return_tensors="pt").to(model.device)

    with torch.no_grad():
        outputs = model.generate(**inputs, max_new_tokens=500)

    return tokenizer.decode(outputs[0], skip_special_tokens=True)
// Step 3: Creating the React Frontend
Build a simple React frontend to interact with our API. In a new terminal, create a React application:
npx create-react-app frontend
cd frontend
npm install axios
Replace the contents of the src/App.js and:
import React, { useState } from 'react';
import axios from 'axios';
import './App.css';
function App() {
const [file, setFile] = useState(null);
const [uploading, setUploading] = useState(false);
const [result, setResult] = useState(null);
const [error, setError] = useState('');
const handleUpload = async () => {
if (!file) { setError('Please select a file'); return; }
setUploading(true);
const formData = new FormData();
formData.append('file', file);
try {
const response = await axios.post(' formData);
setResult(response.data);
} catch (err) {
setError('Upload failed: ' + (err.response?.data?.detail || err.message));
} finally { setUploading(false); }
};
return (
{result && (
Summary
{result.summary}
Action Items
{result.action_items.map((it, i) => - {it}
)}
)}
);
}
export default App;// Step 4: Starting the Application
- Start the backend: In the main directory of your virtual environment, run
uvicorn main:app --reload - Start the frontend: In a new terminal, in the frontend directory, run
npm start - Open it in your browser and load the test audio file
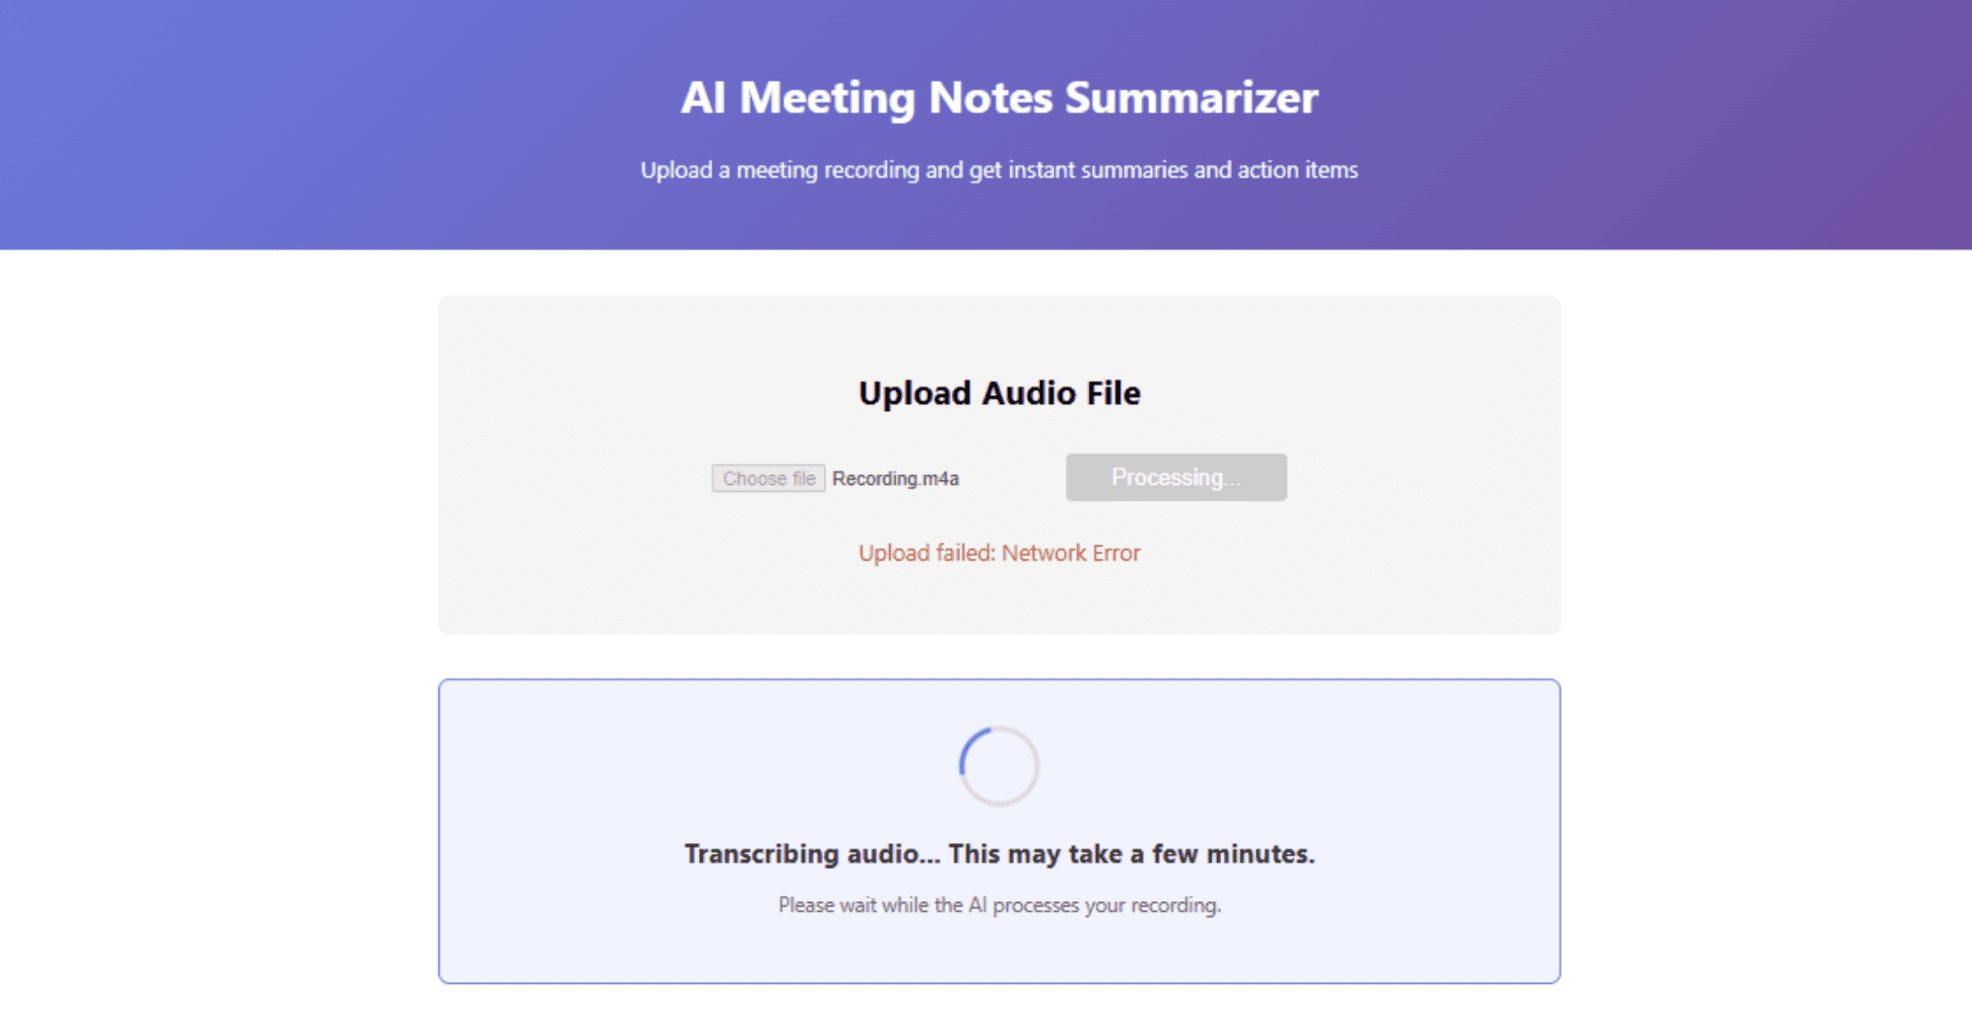
A dashboard interface that displays summary results | Photo by the Author
# Submitting an Application is Free
Once your app is up and running locally, it's time to take it to the world — while it's still free. Give offers a free class of web services. Push your code to a GitHub repository, create a new Web Service in Render, and apply these settings:
- Environment: Python 3
- Build command:
pip install -r requirements.txt - Start Command:
uvicorn main:app --host 0.0.0.0 --port $PORT
Create a requirements.txt file:
fastapi
uvicorn
python-multipart
openai-whisper
transformers
torch
openai
Note: Whisper and Transformers require significant disk space. If you're reaching the limits of the free tier, consider using the cloud API for subscriptions instead.
// Frontind dawns in Vercel
Vercel the easiest way to deploy React apps:
- Install the Vercel CLI:
npm i -g vercel - In your foreground directory, use
vercel - Update your API URL
App.jsto point back to your Render
// It explores alternative uses in the area
If you want to avoid cloud hosting altogether, you can run both frontend and backend on a local server using similar tools Mr temporarily exposing your local server.
# The conclusion
We've just built a production-ready AI app using nothing but free tools. Let's recap what we accomplished:
- Scripting: Used Whisper for OpenAI (free, open source)
- Summary: Leveraged GLM-4.7-Flash or LFM2-2.6B (both completely free)
- Backend: Built with FastAPI (free)
- Frontend: Created with React (free)
- Database: SQLite used (free)
- Deployment: Used in Vercel and Render (free tiers)
- Development: Accelerated by free AI coding assistants like Codeium
The landscape of free AI development has never been more promising. Open source models now compete with commercial offerings. Local AI tools give us privacy and control. And free tiers from providers like Google and Zipu AI allow us to prototype without financial risk.
Long Shithu is a software engineer and technical writer who likes to use cutting-edge technology to make interesting stories, with a keen eye for detail and the ability to simplify complex concepts. You can also find Shittu Twitter.


