Restrict access to sensitive documents in your Amazon Quick knowledge bases for Amazon S3

Organizations that must restrict access to sensitive documents increasingly rely on AI-driven search and chat to help employees find answers across large repositories. Coarse-grained permissions that control access at the knowledge base level work well for many teams, but sensitive documents require more granular control to restrict specific documents or folders to authorized teams, individuals, or systems.
Document-level access control list (ACL) support for Amazon Simple Storage Service (Amazon S3) knowledge bases in Amazon Quick gives you that fine-grained control. You restrict sensitive S3 documents to only the users and groups who should see them, at the document or folder level. When a user asks a question, Quick evaluates their identity against your ACL configuration and only surfaces content that they’re authorized to view. With these controls in place, you can safely bring your full document library into Quick while meeting your compliance and data governance requirements.
In this post, we walk through how to configure document-level ACLs for your S3 knowledge base in Amazon Quick. You will learn how to set up and verify an ACL configuration that enforces document-level permissions across chat and automated workflows. The post covers:
- Controlling which S3 buckets users can access for knowledge base creation using IAM policy assignments
- Planning your access control structure
- Choosing between two ACL configuration methods (Global ACL file and document-level metadata files)
- Setting up permissions for users and groups
- Verifying that your access controls work correctly through chat and ACL-aware Flows
- Updating and maintaining your ACL configuration over time
How S3 ACL works in Quick
You can use the S3 ACL feature in Amazon Quick to attach access permissions to your documents so that chat responses only include content that you’re authorized to view. You specify who can access what documents using standard ALLOW and DENY policies for individual users or groups, and Quick enforces these permissions at query time.
There are two ways to configure ACLs, each suited to different operational needs:
- Global ACL configuration file (such as ACL.json) – A single centralized file that specifies access permissions at the folder (prefix) level. Use this method when your organization has stable, folder-based permission structures.
- Document-level metadata files – Individual metadata files alongside each document that contain per-document access control entries. Use this method when permissions change frequently, because only affected documents need to be reindexed rather than entire folder structures.
Choose your approach based on how often permissions change and how granular you need them to be:
| Consideration | Global ACL File | Document-level metadata |
|---|---|---|
| Permission granularity | Folder (S3 prefix) level | Individual document level |
| Management overhead | Single file to maintain | One metadata file per document |
| Reindex scope on permission change | Entire affected prefix | Only the affected document(s) |
| Recommended for | Stable folder-based access structures | Frequently changing per-document permissions |
Understanding reindex scope
The reindex scope of your chosen method has meaningful operational implications. With the global ACL approach, a permission change triggers a full reindex of the affected prefix. If your organization requires frequent permission updates, consider using document-level metadata files instead, where only the affected documents are reindexed rather than entire folder structures.
Deny-by-default behavior
When you enable ACLs on an S3 knowledge base in Quick, a document or prefix not explicitly listed in your ACL configuration is denied by default. This deny-by-default approach (sometimes called “fail closed,” meaning the system defaults to denying access when no explicit rule exists) means that if you configure ACLs, you must explicitly grant access to every prefix or document you want users to reach.
For example, if your S3 bucket has three folders (/finance/, /legal/, and /policies/) and your ACL file only grants access to /finance/ and /policies/, the /legal/ folder and its contents are automatically denied to everyone, even if no DENY rule exists for it.
The implicit deny model used by IAM works the same way. Quick denies access unless you explicitly grant it. When you configure ACLs, you have explicit control over access and nothing is inadvertently exposed.
If a user or group has both an ALLOW and a DENY entry for the same document or prefix, the DENY always takes precedence. This means that you can use broad ALLOW rules for a team or group and then apply targeted DENY entries to restrict access to specific resources, giving you fine-grained control without having to restructure your entire ACL configuration.
Prerequisites
Before you begin, verify that you have the following:
- An AWS account with Amazon Quick enabled. If you don’t have a Quick account, refer to Getting started with Amazon Quick.
- An Amazon S3 bucket containing the documents you want to index.
- An idea of how you want to structure your access control lists. The following sections explain how to create these files.
- Users provisioned in Quick with email addresses that match the identities in your ACL files. For details on provisioning users, see Managing user access in Amazon Quick.
- Quick admin access for configuring IAM policy assignments and knowledge base creation.
- Familiarity with IAM concepts and basic JSON syntax.
- A test or non-production knowledge base for validating your ACL configuration. Enabling ACLs is a one-way operation that cannot be reversed, so verify your setup before enabling it in production.
Controlling S3 bucket access for knowledge base creation
Document-level ACLs control which documents users can access within a knowledge base, but they don’t control who can create knowledge bases in the first place. Keep this distinction in mind. If your organization has S3 buckets that should always require ACLs (for example, a bucket containing sensitive HR or legal documents), you want to verify that only authorized administrators can create knowledge bases against those buckets. Without this control, a Quick user can create a new knowledge base on the same bucket without turning on ACLs, bypassing your document-level access controls entirely. This section describes how to implement these controls.
IAM policy assignments in Quick let you solve this by restricting which S3 buckets specific users or groups can access for knowledge base creation. For example, you can limit ACL-sensitive buckets to a small set of trusted administrators who will always turn on ACLs during setup, allow broader knowledge base creation for non-sensitive buckets where ACLs aren’t required, or block certain buckets from knowledge base creation entirely by not granting users access to them.
Note: IAM policies assigned through Quick take precedence over AWS resource-level policies. Confirm that your IAM policies meet your access requirements before assigning them.
This step is optional. However, be aware that without IAM policy assignments restricting knowledge base creation, any Quick user with access to an S3 bucket could create a separate knowledge base on that same bucket without enabling ACLs, effectively bypassing your document-level access controls. Consider whether this risk applies to your organization before skipping this section.
Step 1: Create an S3 access policy in IAM
Create an IAM policy in the IAM console that specifies which S3 buckets the assigned users can access. The following example policy grants access to two specific buckets:
{
  "Version": "2012-10-17",
  "Statement": [
    {
      "Effect": "Allow",
      "Action": "s3:ListAllMyBuckets",
      "Resource": "arn:aws:s3:::*"
    },
    {
      "Effect": "Allow",
      "Action": [
        "s3:ListBucket",
        "s3:ListBucketVersions",
        "s3:GetBucketLocation"
      ],
      "Resource": [
        "arn:aws:s3:::amzn-s3-demo-bucket1",
        "arn:aws:s3:::amzn-s3-demo-bucket2"
      ]
    },
    {
      "Effect": "Allow",
      "Action": [
        "s3:GetObject",
        "s3:GetObjectVersion"
      ],
      "Resource": [
        "arn:aws:s3:::amzn-s3-demo-bucket1/*",
        "arn:aws:s3:::amzn-s3-demo-bucket2/*"
      ]
    }
  ]
}
Replace amzn-s3-demo-bucket1 and amzn-s3-demo-bucket2 with the names of the S3 buckets that you want to grant access to.
Step 2: Assign the policy in Quick
After creating the IAM policy, assign it to Quick users or groups through the admin console.
To assign the policy in Quick:
- In the Quick admin console, under Permissions, choose IAM policy assignments.
- Choose Add new assignment.
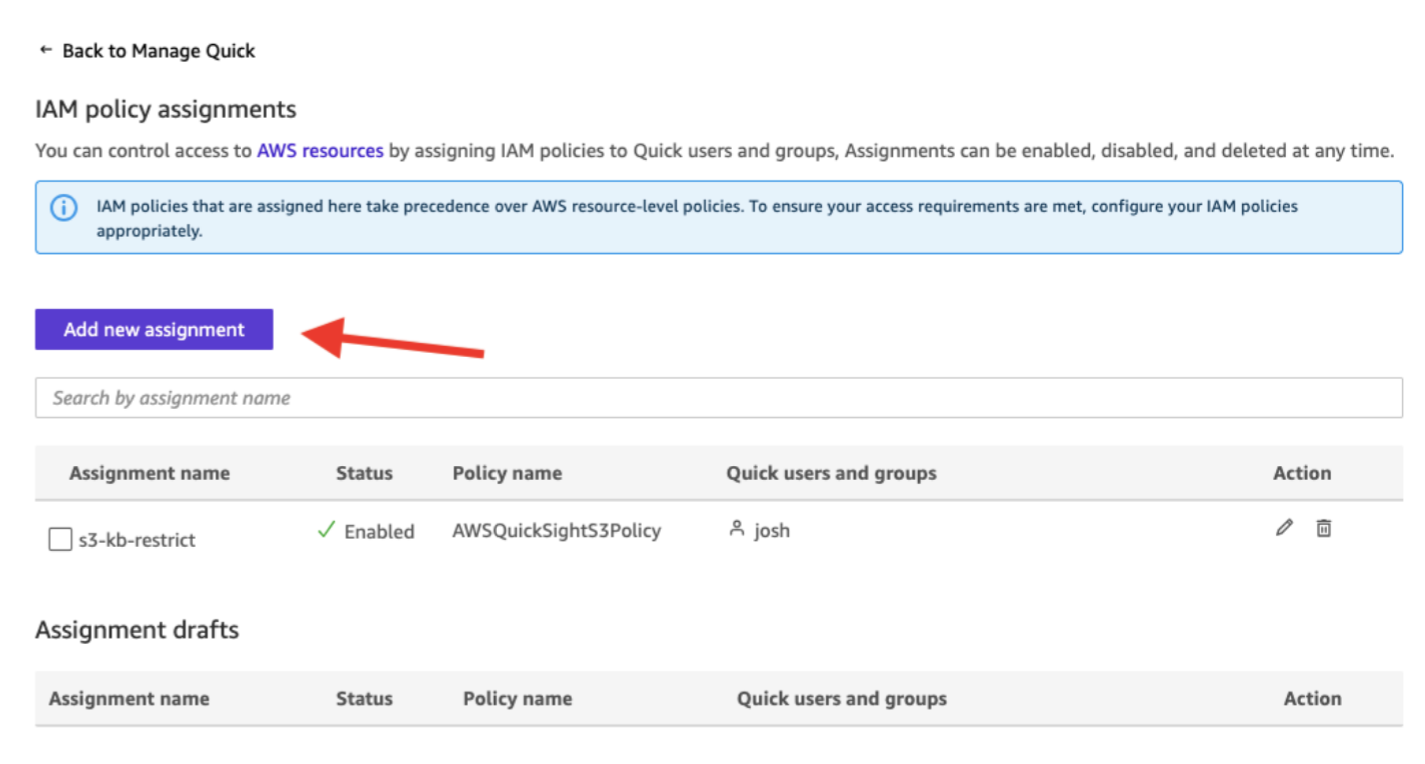
- Enter a name for the assignment (for example,
s3-kb-restrict).
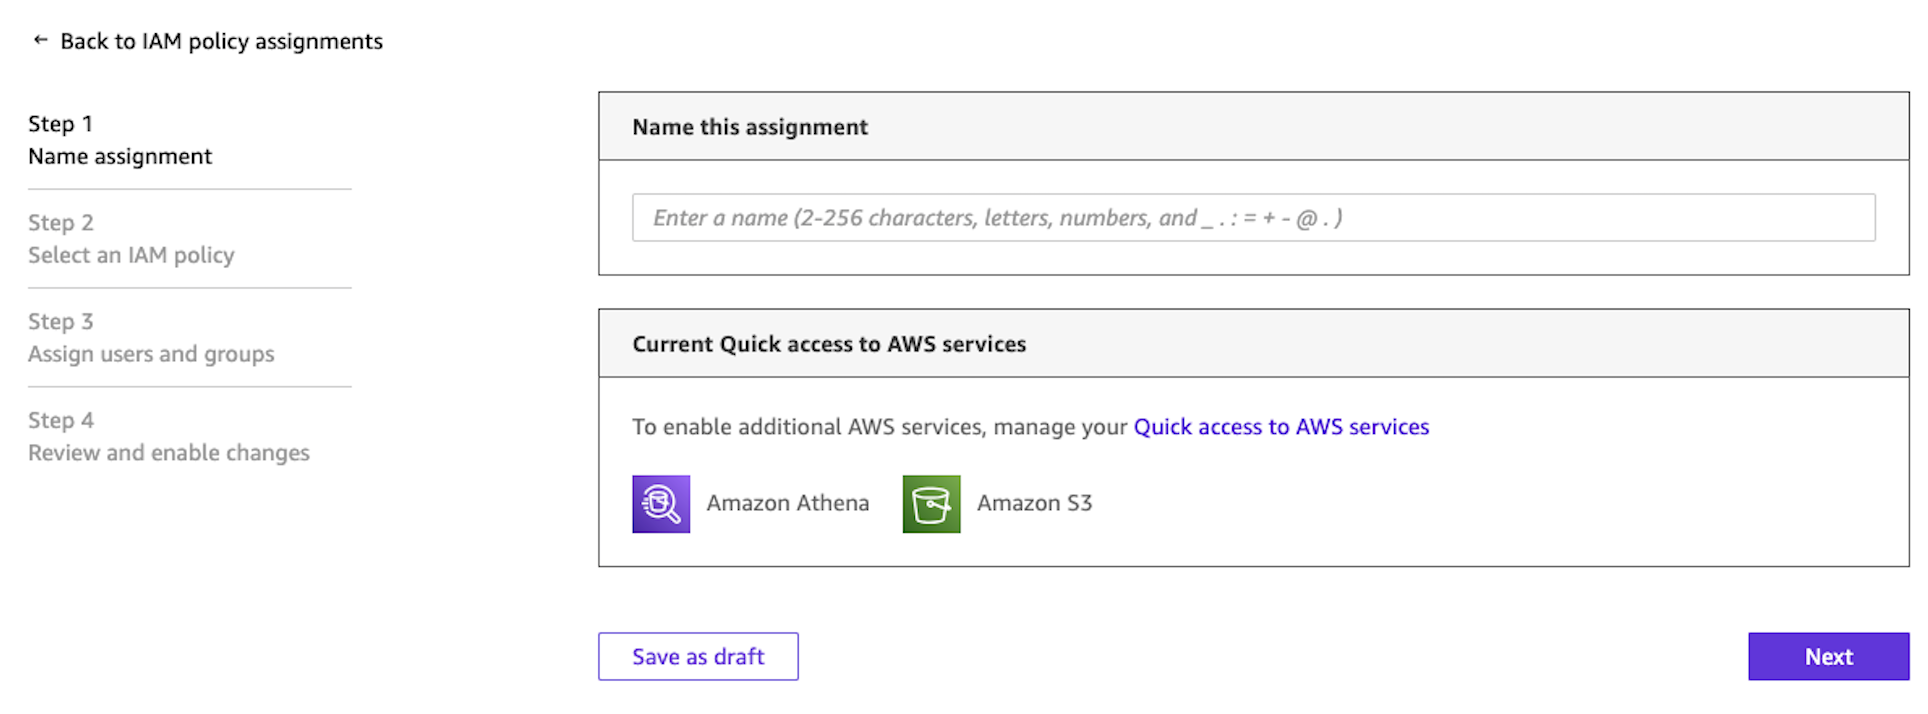
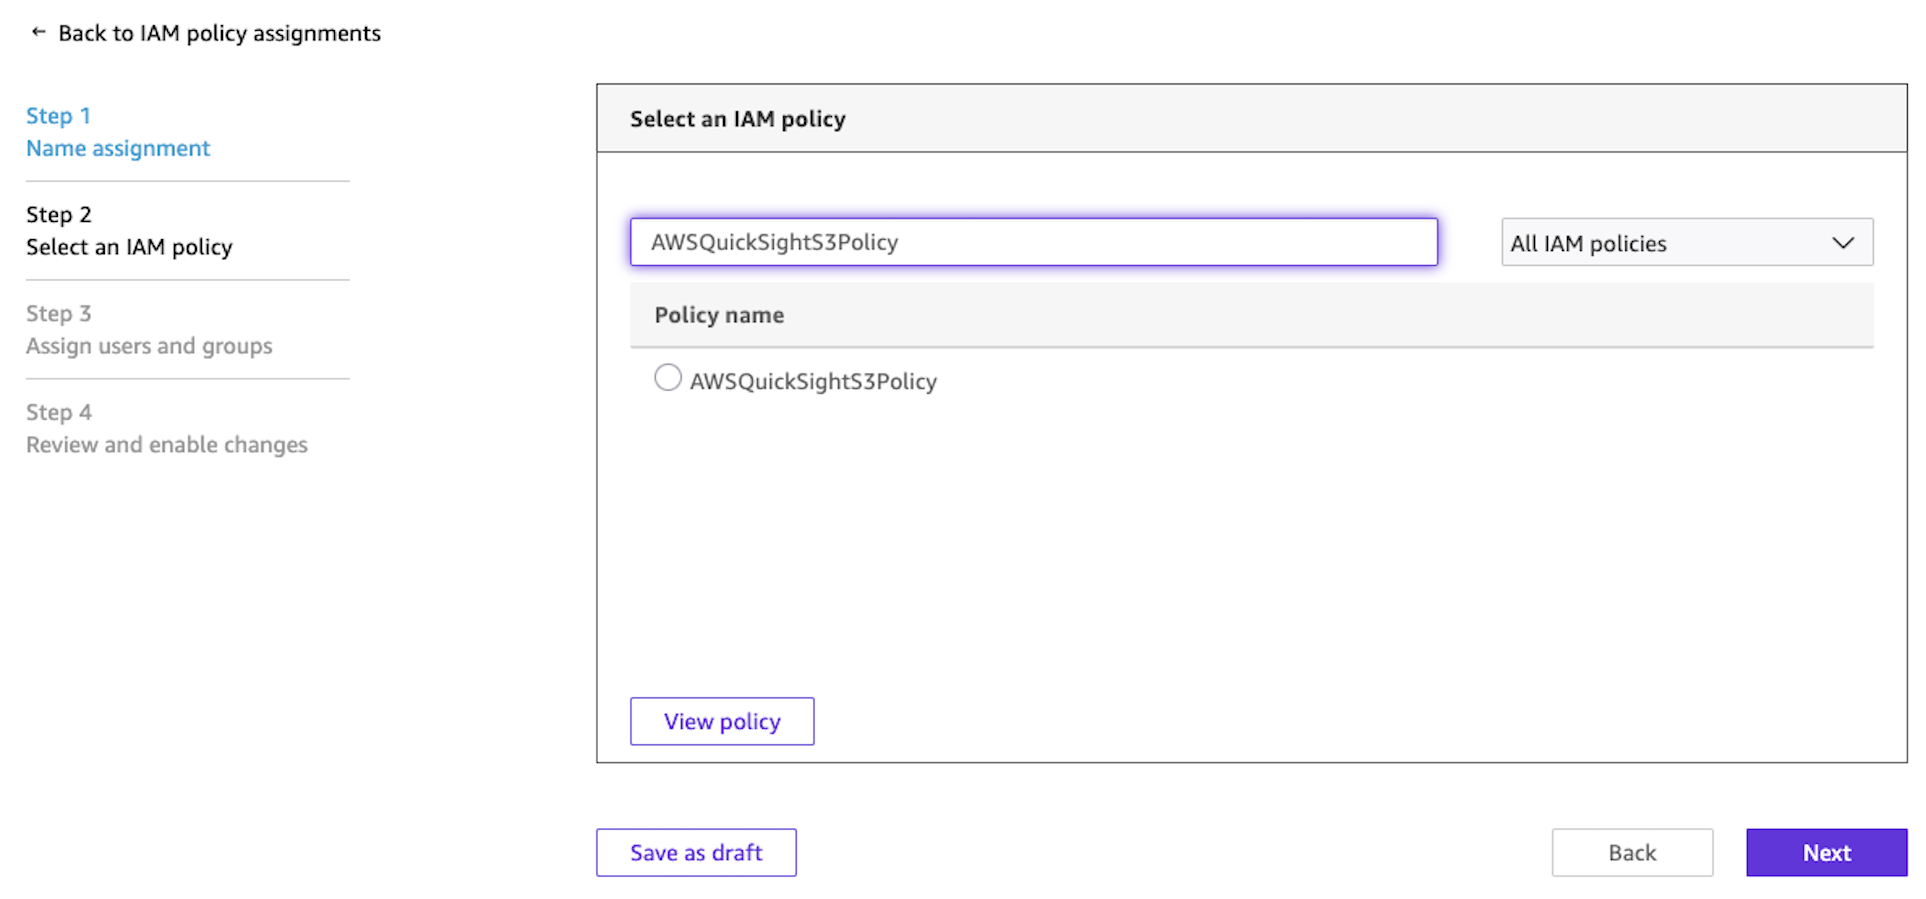
- On the Select an IAM policy page, search for and select the IAM policy you created in Step 1. Choose Next.
- On the Assign users and groups page, choose one of the following:
- Select Assign to users and groups to apply the policy to current and future users.
- Search for and select specific users or groups to assign the policy to.
- Choose Next.
- On the Review and enable changes page, verify your assignment details and choose Save and enable.

Users who aren’t explicitly granted access through an IAM policy assignment can’t use the restricted S3 buckets to create knowledge bases. A user can still access a knowledge base shared with them. The restriction only applies to knowledge base creation. The IAM policy assignment gives you a layer of administrative control that complements the document-level ACLs you configure within each knowledge base.
For more details, see Restrict Amazon S3 bucket access with IAM policy assignments in the Amazon Quick documentation.
Planning your access control structure
Before creating your ACL files, determine your access control structure. Quick enforces the permissions you configure, but it’s up to you to decide who should have access to which documents and to build the corresponding ACL files.
Start by mapping your organizational access needs. Identify which teams, roles, or individuals need access to which document sets. Then choose your ACL method: a single global ACL file or ACL entries in metadata files at the document-level. Finally, align your identities. The user and group names in your ACL files must match the email addresses and group names of your Quick users (email matching is case-insensitive, but group names must match exactly). Group membership is managed in your Identity provider (IdP), such as IAM Identity Center, and synced with Quick, not in the ACL files themselves.
The following examples illustrate common access patterns and how you might structure them.
| Access pattern | Method | Example configuration |
| Team-wide folder access | Global ACL file | ALLOW group finance-team on s3://amzn-s3-demo-bucket/finance/ |
| Company-wide read access | Global ACL file | ALLOW group all-employees on s3://amzn-s3-demo-bucket/policies/ |
| Single-user document access | Document-level metadata | ALLOW user [email protected] on roadmap-2026.pdf |
| Restricted folder (deny-by-default) | Global ACL file | ALLOW group legal-team on s3://amzn-s3-demo-bucket/legal/ (other prefixes denied by default) |
| Combined approach | Both methods | Global ACL ALLOWs hr-team on s3://amzn-s3-demo-bucket/hr/ + metadata file ALLOWs [email protected] on a specific file |
Option 1: Configure access using a Global ACL file
⚠️ Before you begin: Enabling document-level ACLs on a knowledge base is a one-way operation and can’t be reversed. If you need to remove ACL functionality later, you must create a new knowledge base without ACLs. Test your ACL configuration on a non-production knowledge base first, because this setting can’t be turned off after it’s enabled.
The global ACL file is a single JSON file that maps S3 prefixes to access control entries. Upload this file to the root of your S3 bucket. The file doesn’t need to be named acl.json.
Global ACL file structure
The file is a JSON array where each entry specifies an S3 prefix and its associated access control entries.
Each aclEntries item includes:
- Name – The user email address or group name. This must match the identity within Quick exactly. For example, a user’s email or group from IAM Identity Center.
- Type – Either USER or GROUP.
- Access – Either ALLOW or DENY.
Remember, prefixes not listed in this file are denied by default.
Steps to configure
- Create your acl.json file following the structure shown previously.
- Upload the acl.json file to the root of your S3 bucket (the same bucket that contains your documents).
- In the Quick console, navigate to Knowledge.
- Select Amazon S3 as a knowledge base and configure your S3 bucket settings.
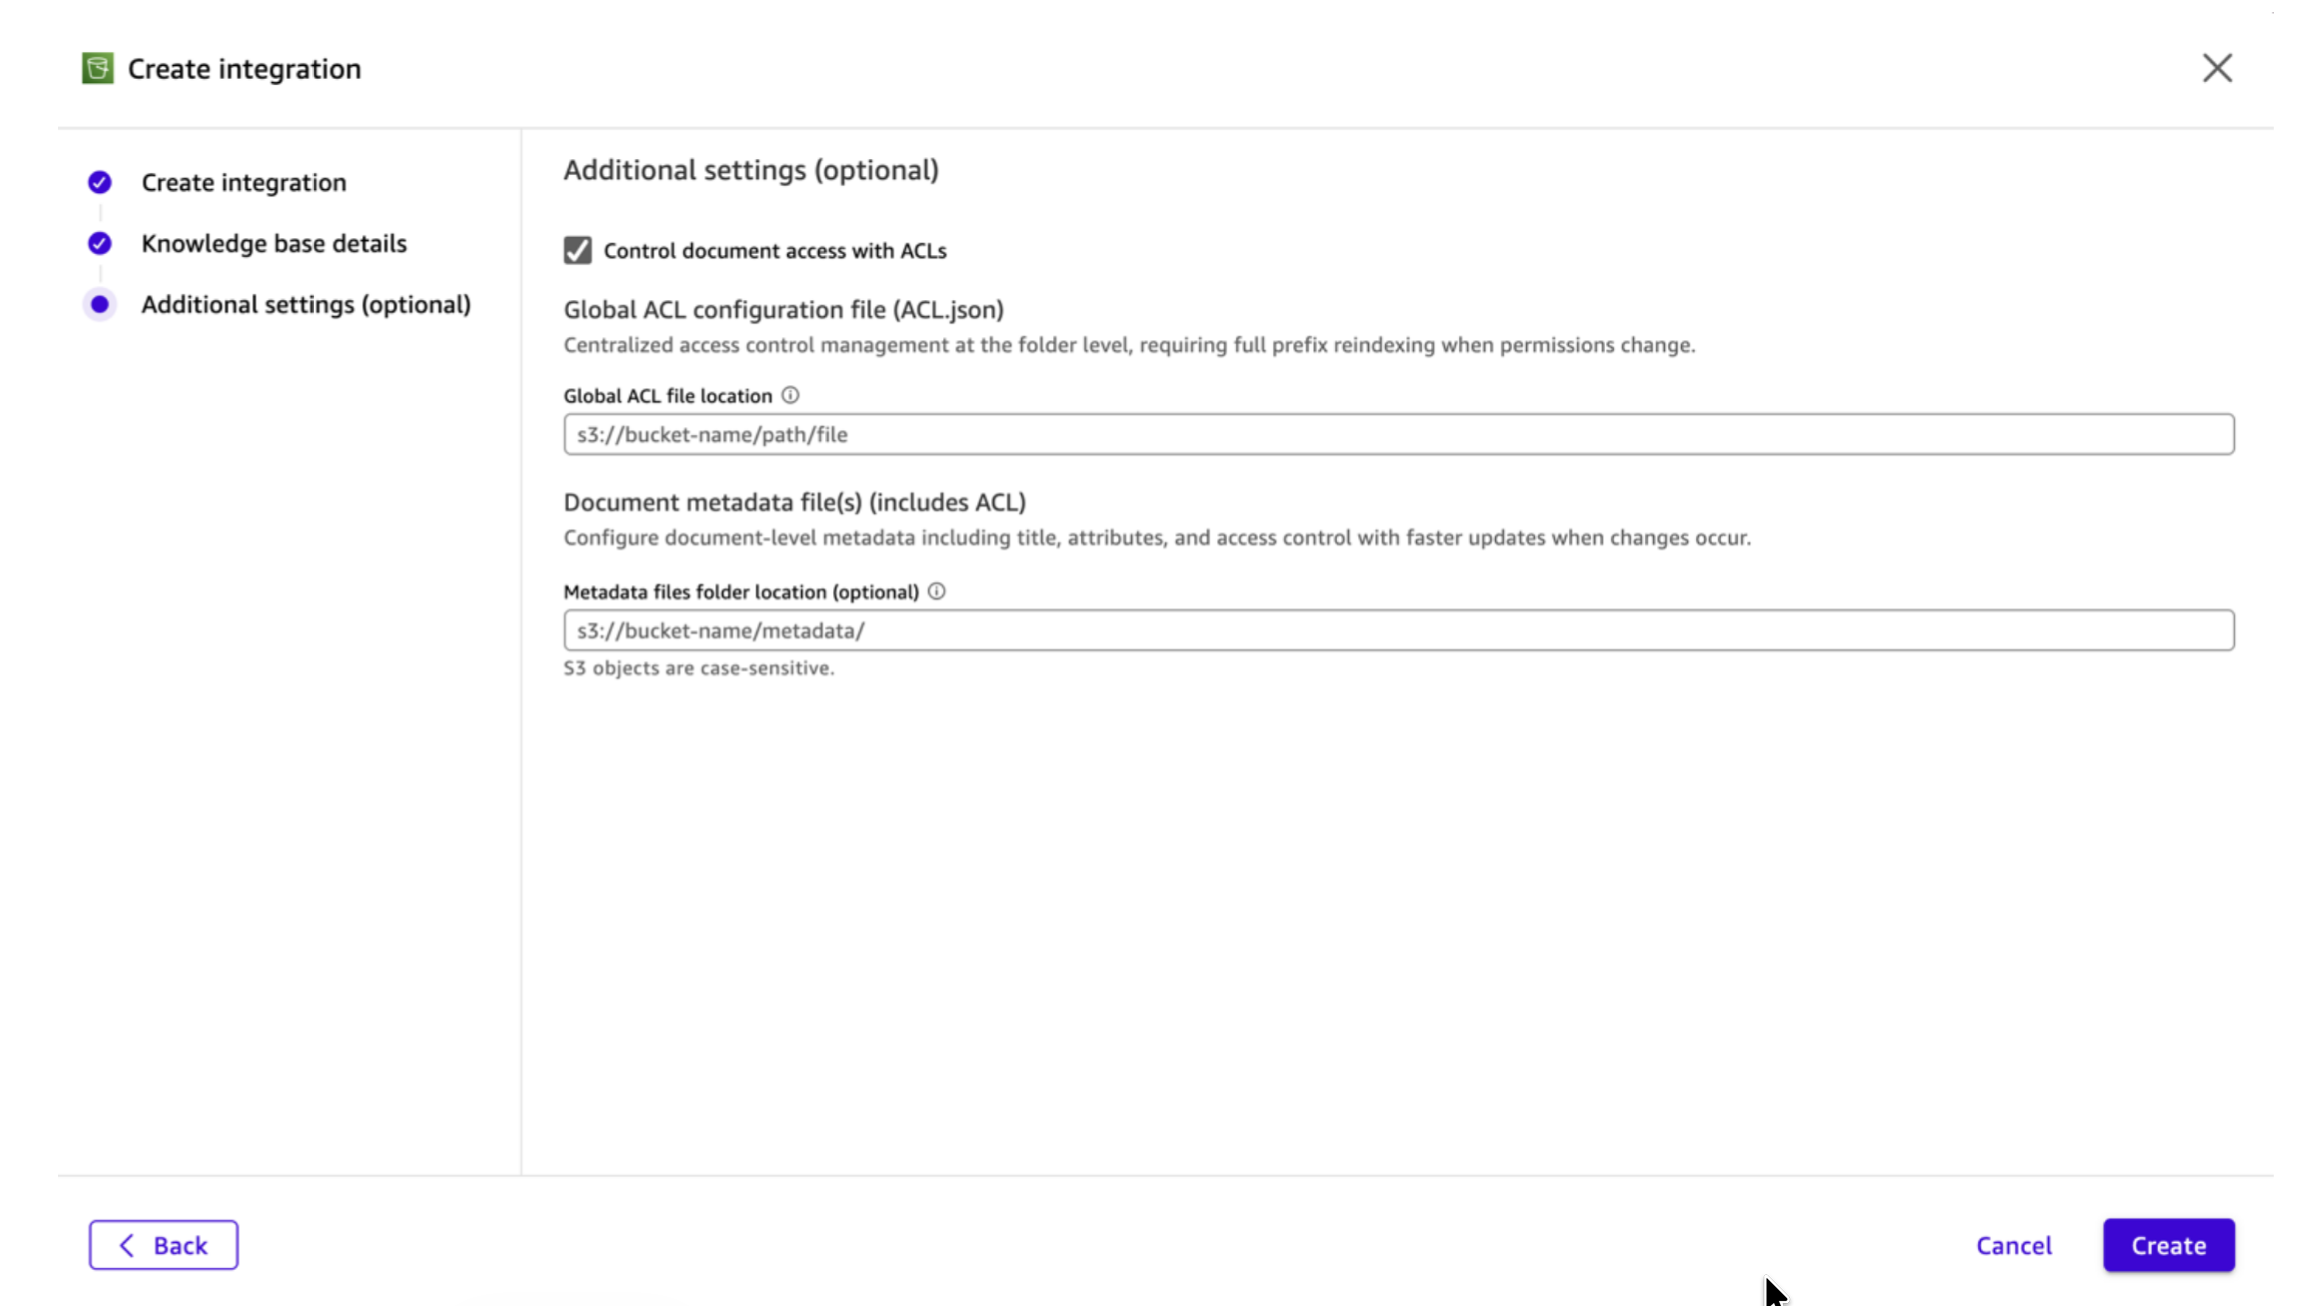
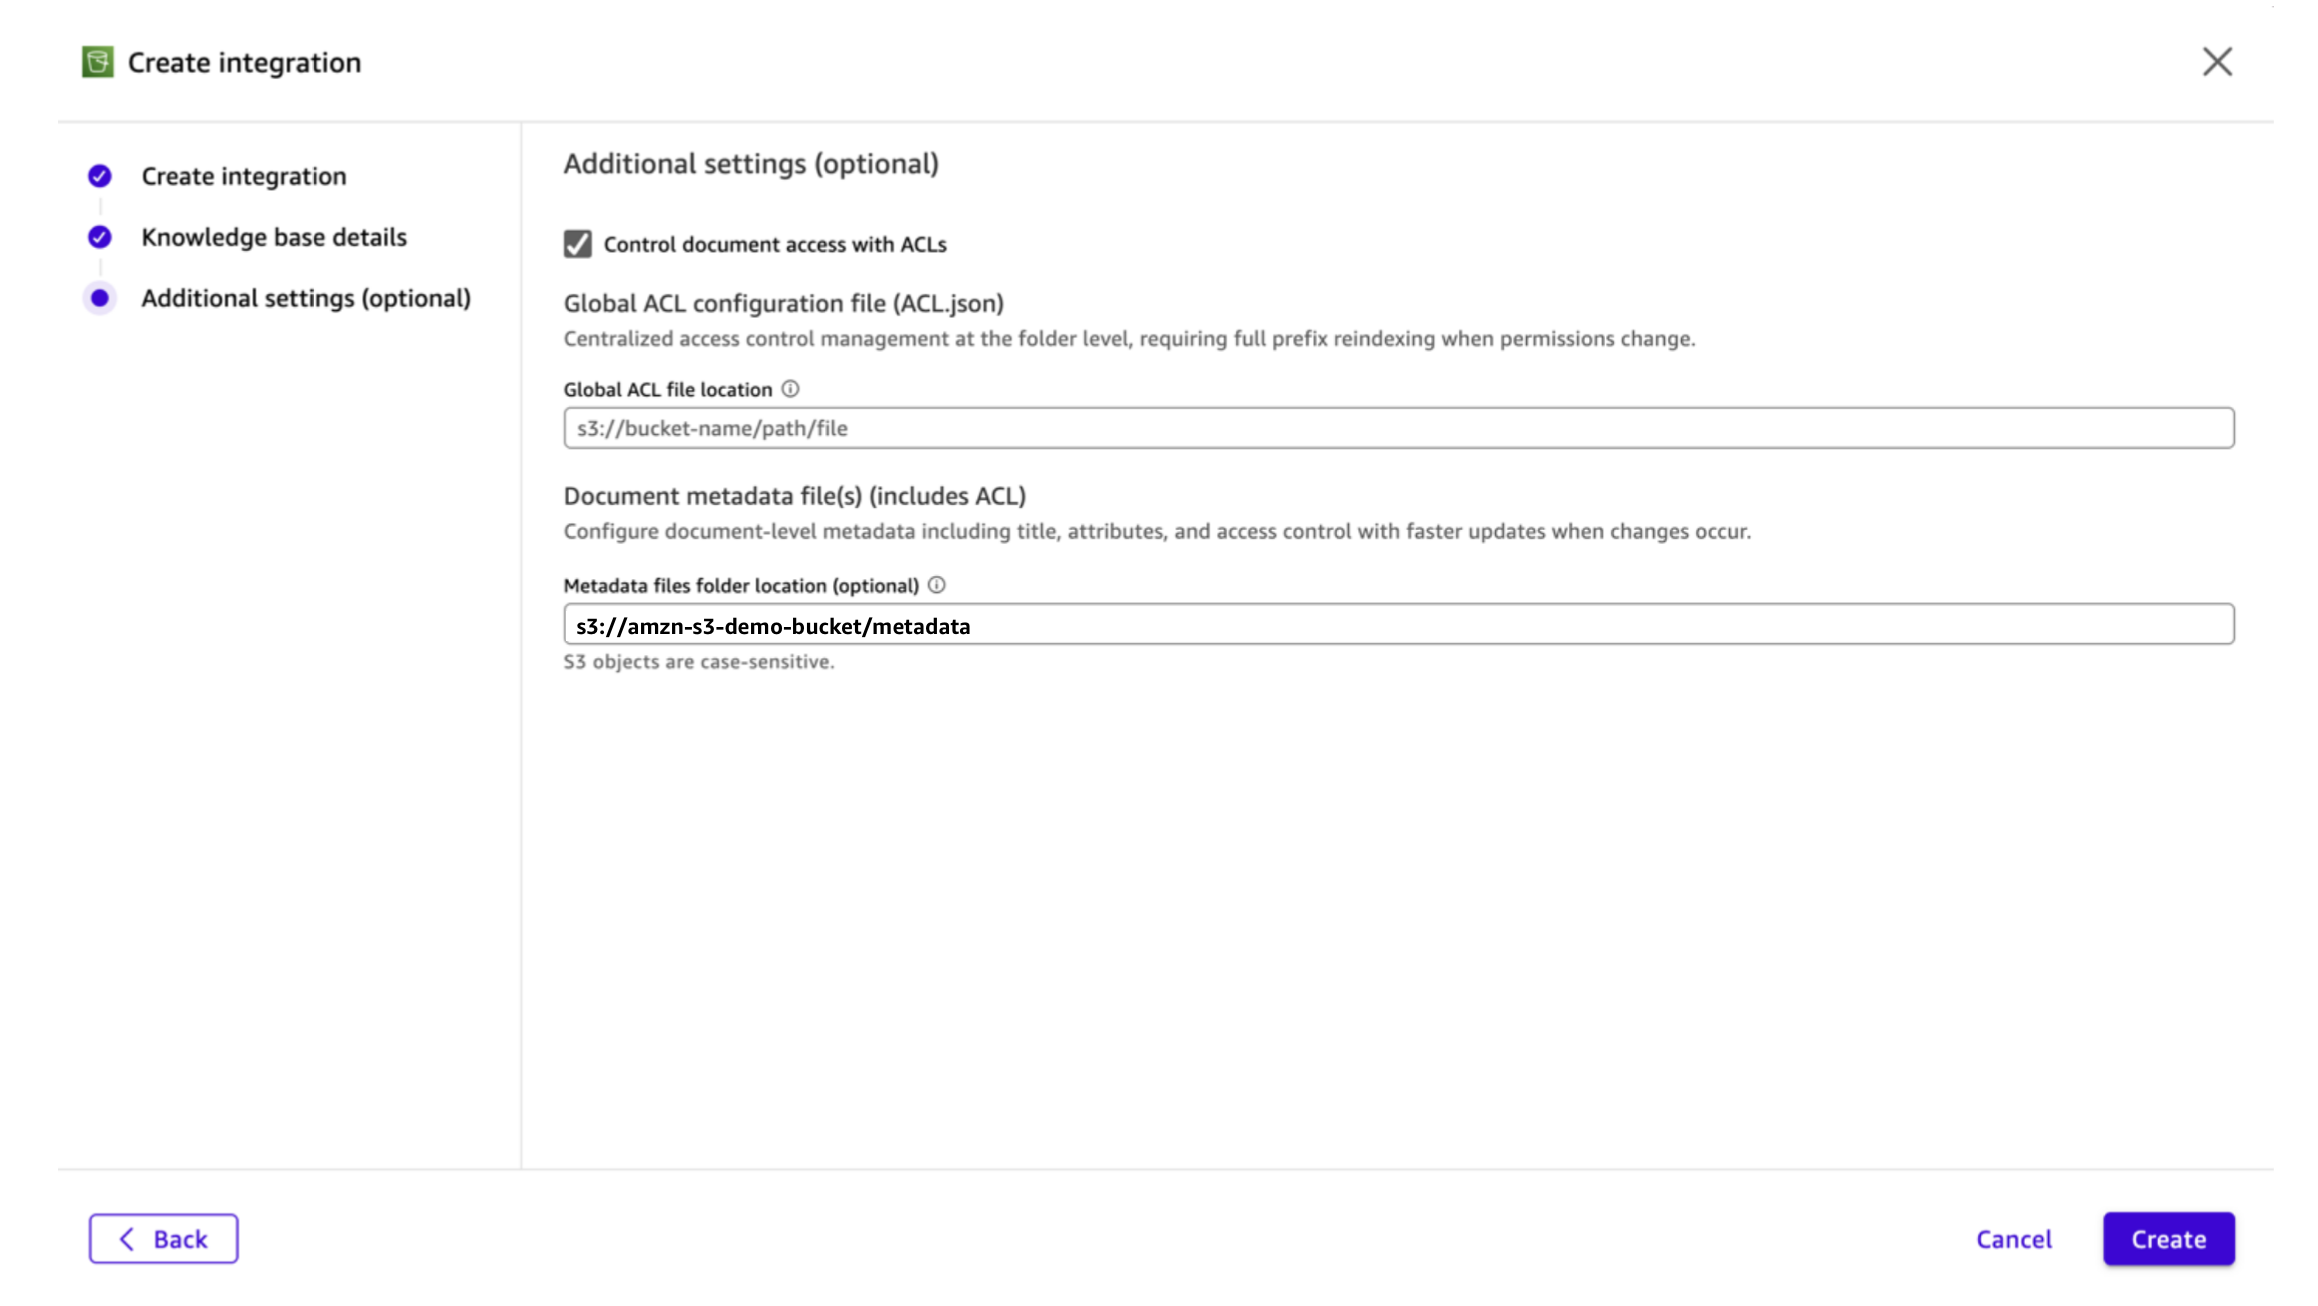
- Enter your knowledge base details and choose Next: Additional settings.
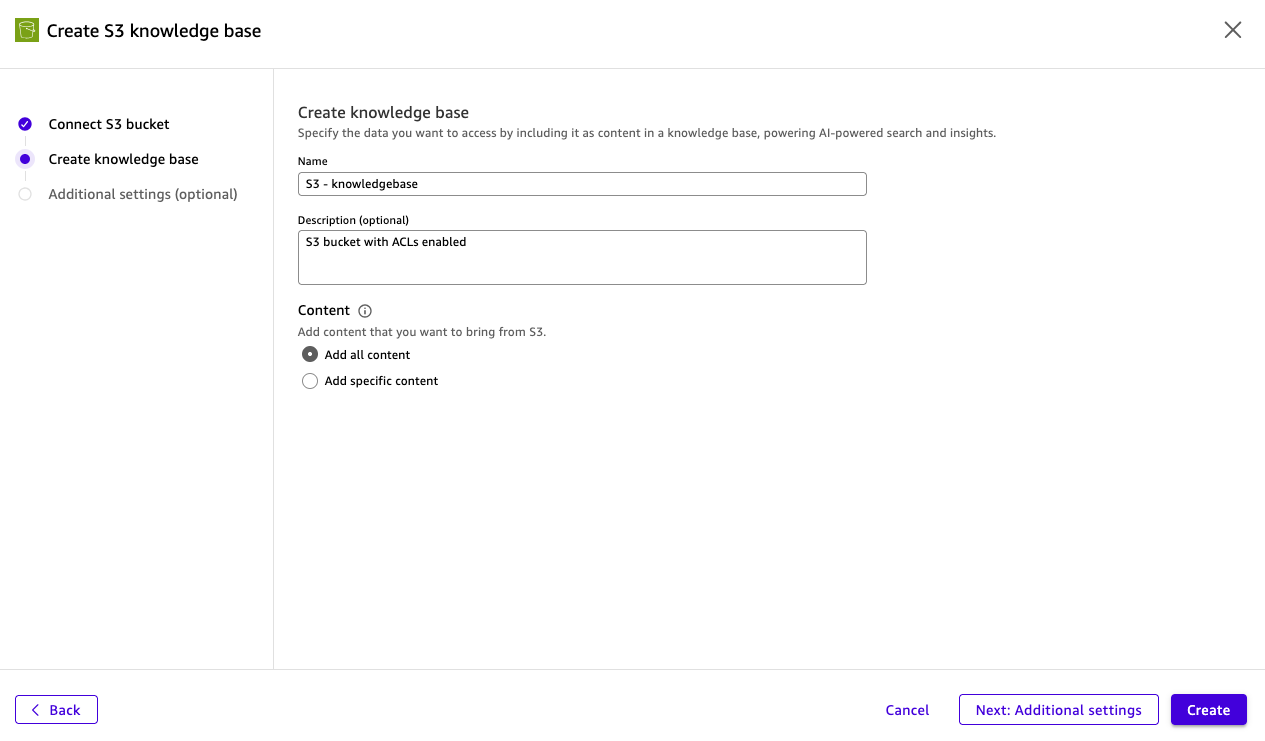
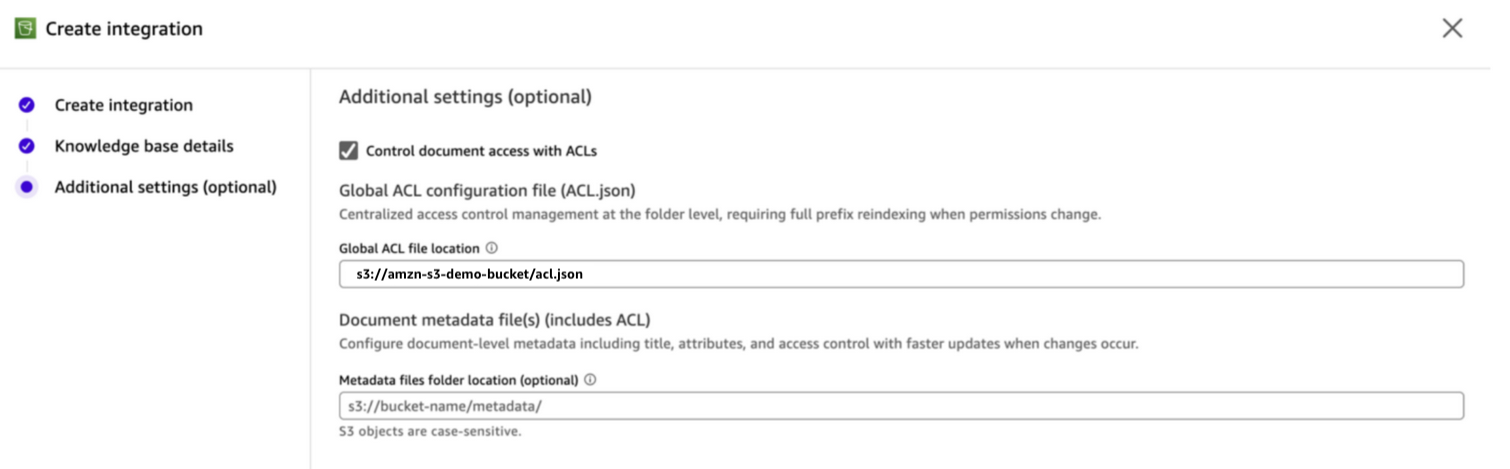
- Under Additional settings, turn on the Access control list (ACL) option.
- In the Global ACL file location field, enter the S3 URI to your acl.json file (for example,
s3://amzn-s3-demo-bucket/acl.json).
- Choose Create.
- Start a sync to index your documents. Quick applies the ACL rules during indexing.
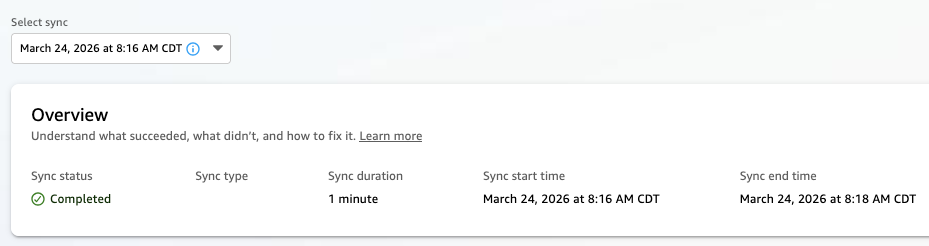
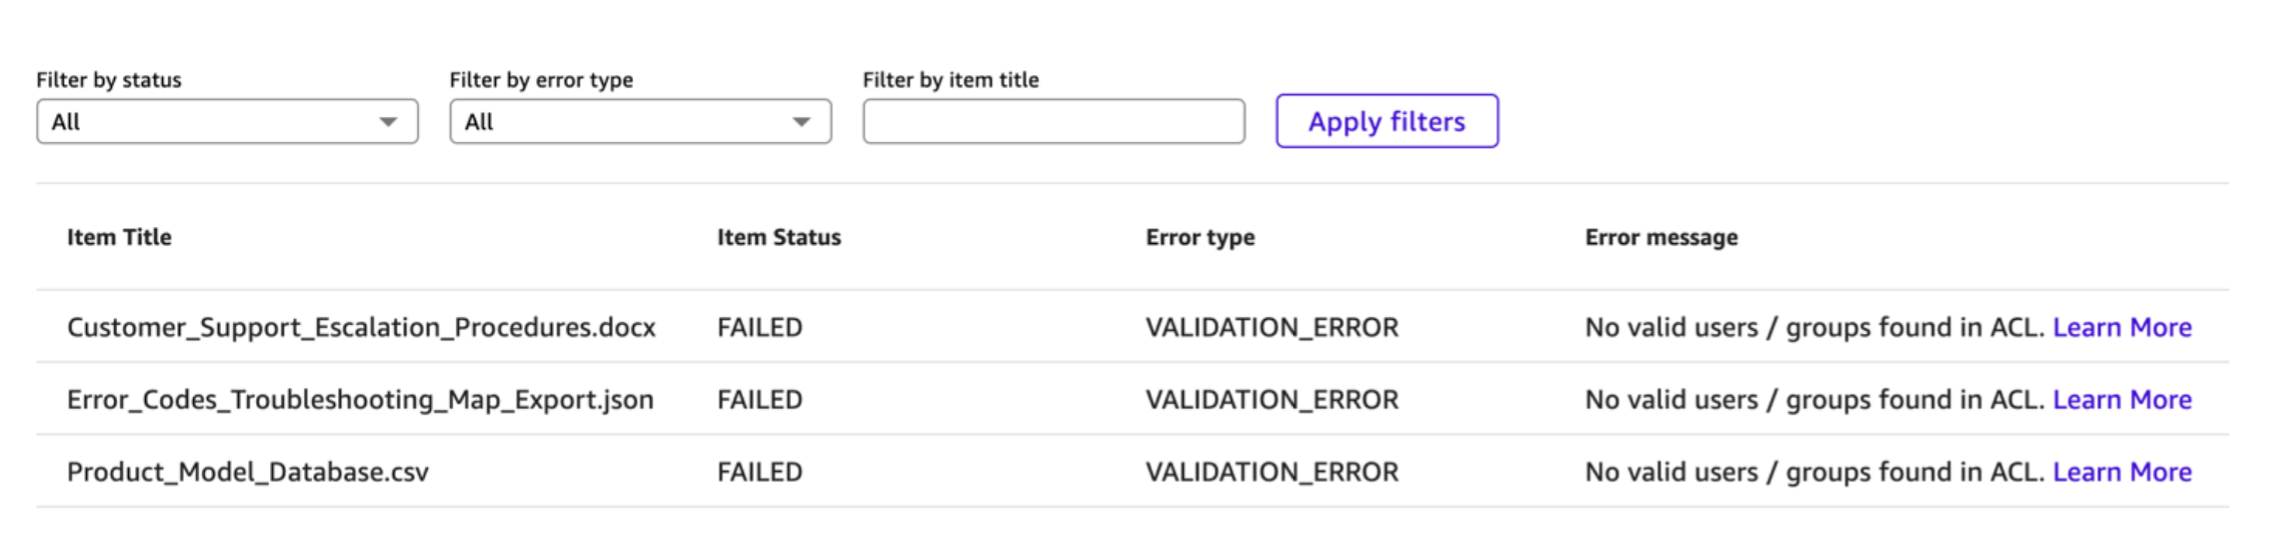
After the sync completes, only documents under prefixes with explicit ALLOW entries will be indexed and available in chat. You can review the sync run report to see which documents were indexed and which were not indexed because of ACL restrictions.
Successfully added files:
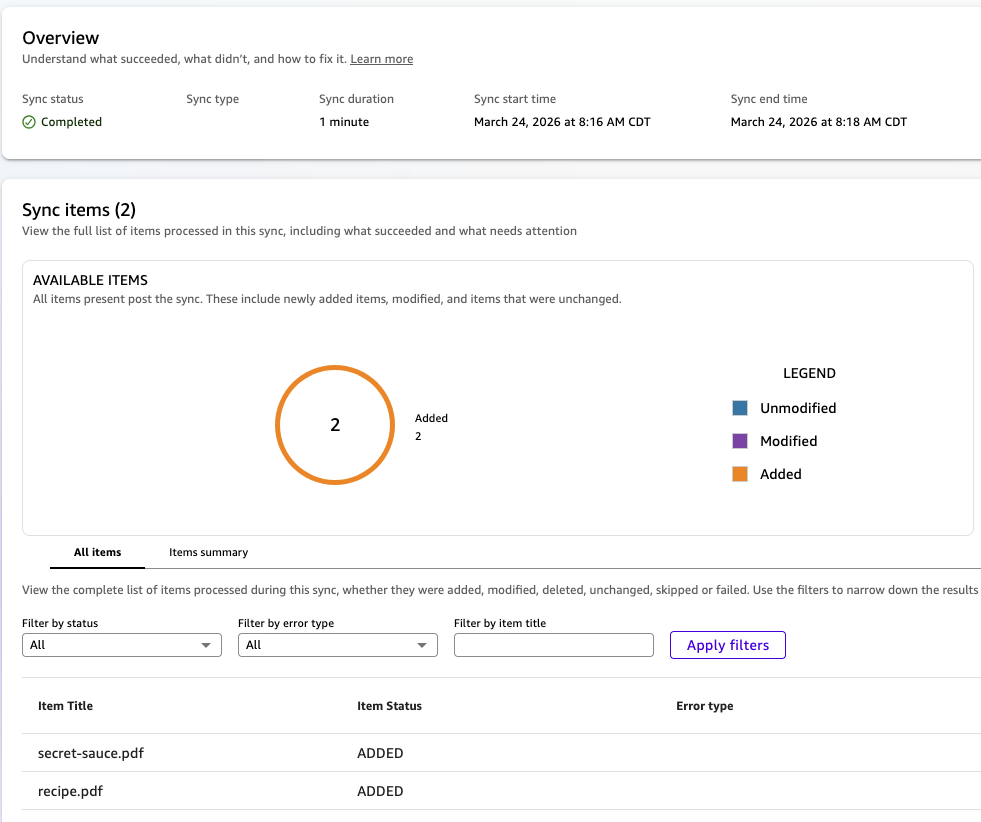
Failed files:
Option 2: Configure access using document-level metadata files
⚠️ Before you begin: Enabling document-level ACLs on a knowledge base is a one-way operation and can’t be reversed. If you need to remove ACL functionality later, you must create a new knowledge base without ACLs. Test your ACL configuration on a non-production knowledge base first, because this setting can’t be turned off after it’s enabled.
If you need per-document control or want faster reindexing when permissions change, you can use document-level metadata files. Each document in your S3 bucket gets a corresponding metadata JSON file that includes access control entries.
Metadata file structure
Create a .metadata.json file for each document. The metadata file must be stored in the same S3 bucket, in a metadata folder location that you specify during knowledge base setup or as a sidecar next to the actual document being indexed. We explain the two options in the following section.
The file includes an AccessControlList array. Only the AccessControlList field is required for ACL enforcement. The other fields (DocumentId, Attributes, Title, ContentType) are optional and used for additional metadata enrichment:
The AccessControlList entries follow the same format as the global ACL file. Each entry has a Name, Type (USER or GROUP), and Access (ALLOW or DENY).
Documents without a metadata file (or with a metadata file that doesn’t include an AccessControlList) are denied by default when ACLs are turned on.
Metadata file name and location
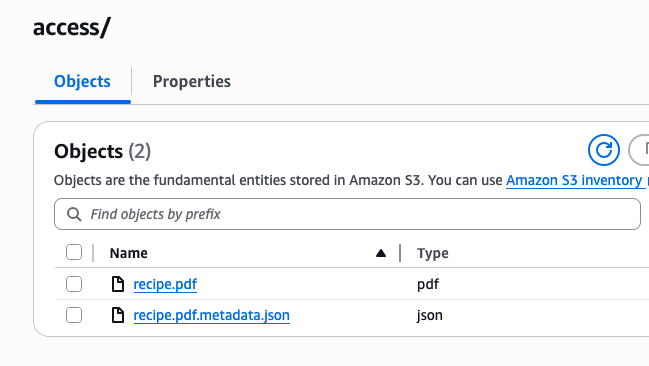
For the knowledge base to find the correct metadata file, the document’s S3 key is appended to the metadata folder location and then suffixed with .metadata.json to build the metadata file’s Amazon S3 path. For example, if the file S3 key is recipe.pdf, the metadata file S3 key would be recipe.pdf.metadata.json.
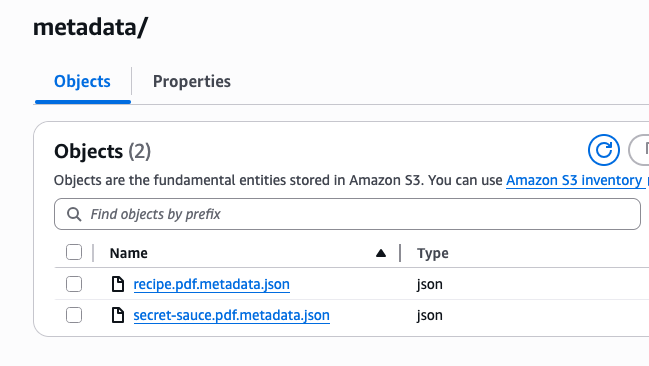
There are two options for where to place your metadata files. You can put them in a dedicated directory (such as s3://amzn-s3-demo-bucket/metadata) or in the same folder as the referenced file.
Here’s an example of the files together in the same folder:
Another example with a dedicated “metadata” folder:
Steps to configure
- Create a .metadata.json file for each document that you want to index, including the AccessControlList field.
- Upload the metadata files to your S3 bucket in either a dedicated metadata folder or in the same folder as each matching S3 file.
- In the Quick console, navigate to Knowledge.
- Select Amazon S3 as a new knowledge base.
- Under Additional settings, turn on the access control list (ACL) option.
- For metadata file location, choose one of the following options:
- Same folder option: Leave the metadata folder location blank.
-
- Dedicated folder option: In the Metadata folder location field, enter the S3 URI to your metadata folder (for example,
s3://amzn-s3-demo-bucket/metadata/).
- Dedicated folder option: In the Metadata folder location field, enter the S3 URI to your metadata folder (for example,
- Choose Create.
- Start a sync. Quick reads the ACL entries from each metadata file and enforces them at query time.
Verifying your configuration
After your knowledge base sync completes, you can verify that ACLs are working correctly through chat and flows.
Chat
To verify ACLs in chat:
- Open a chat in Quick and connect to your ACL-enabled knowledge base.
- Disable web search at the bottom of your chat session to isolate results to your knowledge base.
- Ask a question about a document that you have access to. You should receive a relevant response.
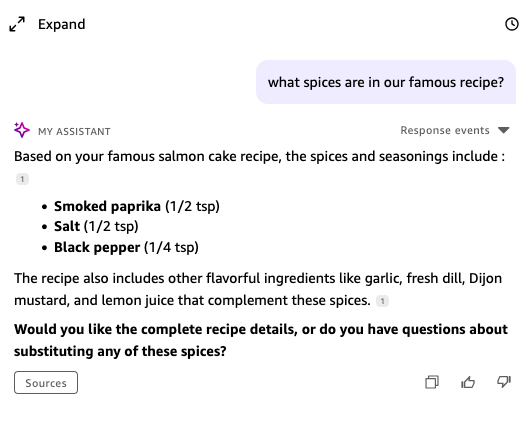
- Ask a question about a document that you don’t have access to. Quick shouldn’t surface content from that document.
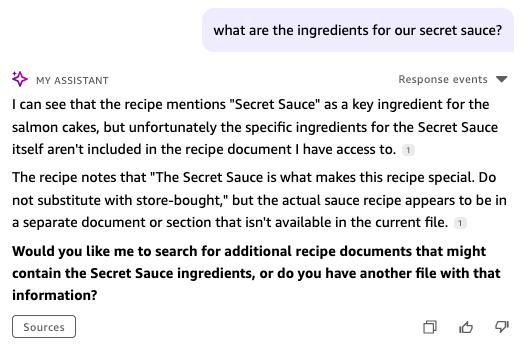
The ACL verification confirms that Quick is filtering responses based on your identity and ACL configuration.
Flows
With Quick Flows and S3 ACLs, you can build intelligent, permission-aware automation pipelines that respect data governance while delivering insights at scale.
The following example explores a flow concept: ACL-aware flows for executive summaries.
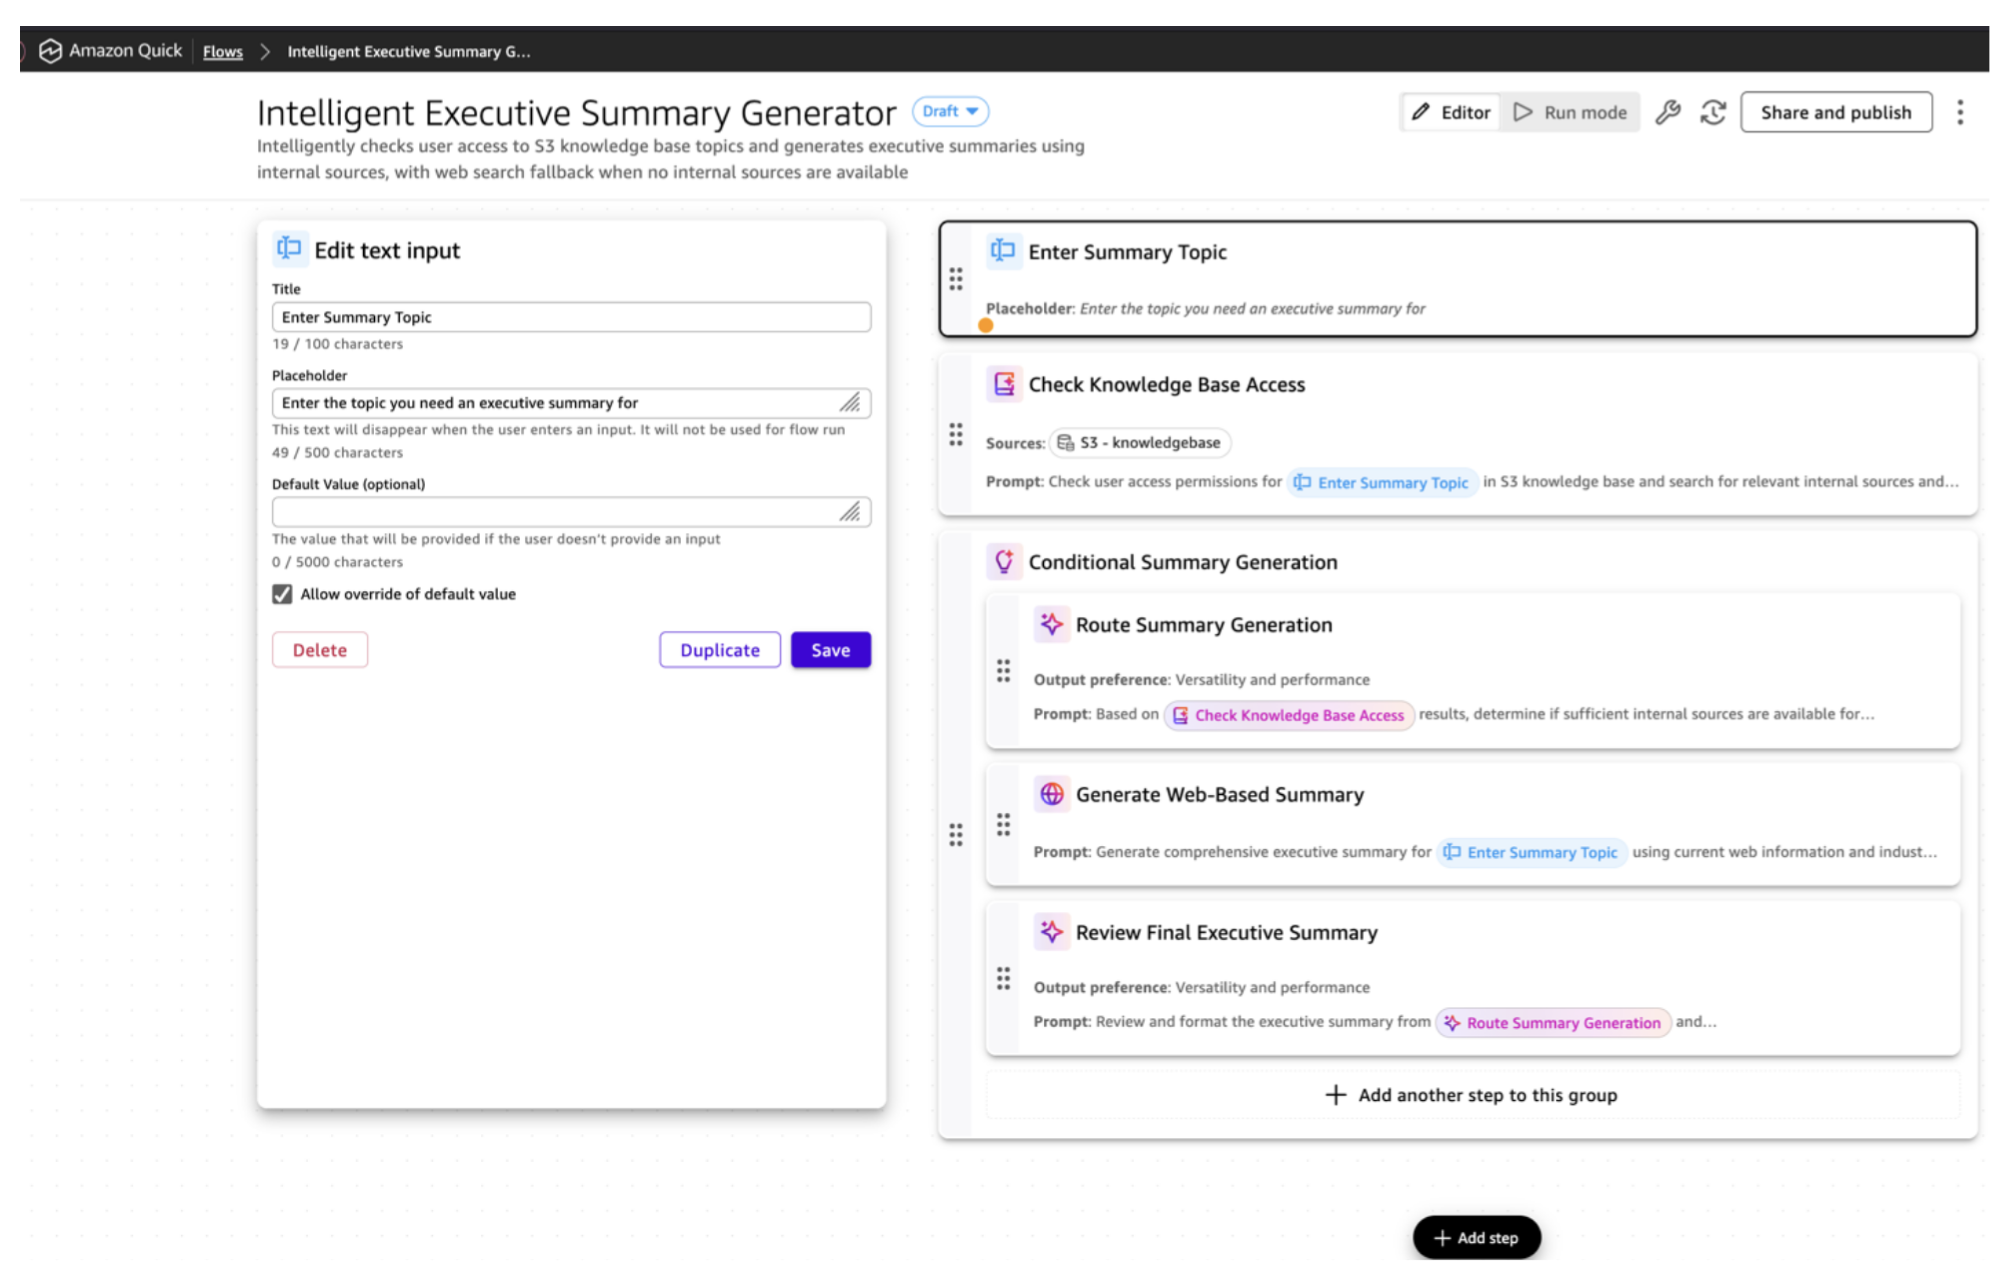
The flow contains the following steps:
- Trigger and user context: A user submits a topic using the Chat or Flow console. The flow captures their identity for access evaluation.
- S3 ACL evaluation: The flow checks ACL configurations to determine which documents you can access, enforcing data governance at the automation layer.
- Internal summary generation: If authorized documents exist, the flow retrieves them and produces an executive summary from internal sources.
- Web search fallback: When no internal sources are accessible, the flow automatically searches the web. External summaries are clearly labeled for transparency. This is an optional step of the Flow.
You can further expand this use case by passing the summary to a downstream step that creates a structured slide deck for leadership briefings, or by adding an email step to send summaries to users or distribution lists on a recurring schedule.
Updating ACLs after initial setup
When your organization evolves (new hires, team changes, role transitions), update your access control configuration accordingly. Quick doesn’t monitor your ACL files for changes in real time. Updated permissions take effect at the next knowledge base sync, which runs daily by default. For time-sensitive changes such as revoking access, trigger a manual sync immediately after updating your ACL files. To update permissions:
- Update your ACL files in S3. Modify your global ACL file or the relevant document-level metadata files to reflect the new permissions (adding users, removing access, changing group memberships, and so on).
- Resync your knowledge base. After uploading the updated files to S3, trigger a new sync on your knowledge base from the Quick console. Quick re-evaluates the ACL entries during the sync and updates the index accordingly.
Until the sync completes, the previous permissions remain in effect.
The reindex scope depends on which configuration method you use:
- Global ACL file. The entire affected prefix is reindexed.
- Document-level metadata. Only the documents whose metadata files changed are reindexed.
If you anticipate frequent permission changes, document-level metadata files give you faster turnaround on access updates.
Securing your ACL files
Restrict s3:PutObject permissions on your ACL and metadata files to a limited set of administrators. Anyone who can modify these files can grant themselves access to any document, so treat write access to ACL files as a privileged operation. Enable S3 versioning on your ACL files to maintain an audit trail of permission changes. For document-level metadata files, assign ownership to team members familiar with the sensitivity of each document set, such as data owners or security leads, so that permission decisions stay aligned with business context.
Monitoring and auditing ACL activity
For a security feature like document-level ACLs, visibility into configuration changes and access patterns is essential. Amazon Quick provides several mechanisms to help you monitor and audit your ACL-enabled knowledge bases.
All knowledge base create and update actions are logged in AWS CloudTrail, including whether ACLs are enabled on the knowledge base. This gives administrators an audit trail of who configured ACLs and when, helping you track changes to your access control setup and investigate any unexpected modifications.
Amazon Quick also provides a feature for monitoring the size of your knowledge bases, which can help you track growth and detect unexpected changes in indexed content. For more details, see monitor index storage usage in the Quick documentation.
Limitations and considerations
Before you turn on ACLs on your S3 knowledge base, be aware of the following:
- ACLs can’t be disabled after they’re enabled. Turning on document-level ACLs on a knowledge base is a one-way operation. If you need to remove ACL functionality later, you must create a new knowledge base without ACLs.
- User identity matching is email-based. The Name field in your ACL entries must exactly match the email address associated with the user’s Quick identity. If a user’s email changes, update your ACL files and resync.
For additional limitations, see S3 data source connector limitations and Knowledge base ACL limitations in the Amazon Quick documentation.
Clean up resources
If you created resources while following this post and no longer need them, take the following steps to avoid ongoing charges:
- Delete the knowledge base. In the Quick console, navigate to Knowledge, select the knowledge base that you created, and choose Delete.
- Remove ACL and metadata files. Delete the global ACL file and document-level .metadata.json files from your S3 bucket if they were created for testing purposes.
- Remove IAM policies. If you created an IAM policy for S3 bucket access restrictions, first remove the IAM policy assignment in the Quick admin console, then delete the IAM policy itself in the IAM console.
Conclusion
Document-level ACLs for Amazon S3 knowledge bases in Amazon Quick give you granular control over who can access specific documents in your knowledge base. In this post, you configured IAM policy assignments to control knowledge base creation, planned an access control structure, set up both Global ACL files and document-level metadata files, verified your configuration through chat and Flows, and learned how to troubleshoot common issues.
With these controls in place, you can confidently expand the content in your knowledge bases, knowing that each user only sees the documents and data they are authorized to access. This helps your organization get more value from Quick while meeting security, compliance, and data governance requirements. Quick Flows extends these controls into automated workflows, checking user access at runtime and generating outputs from only the documents a user is authorized to see. With document-level ACLs, your organization can confidently use AI to unlock the value of sensitive data, securely.
Next steps
To continue building on what you’ve learned:
- Review the Amazon S3 connector documentation for detailed configuration reference.
- Read the ACL best practices guide for recommendations on structuring your access controls at scale.
- Try setting up ACLs on a test knowledge base with sample documents before rolling out to production. Start with a small set of documents and a few test users, then expand once you’ve verified the configuration works as expected.
To learn more about Amazon Quick, visit the Quick product page, explore the security features in Quick, and join the Quick Community to ask questions and share your experiences.
About the authors


