

Financial institutions running on AWS and Snowflake benefit from a deeply integrated framework that combines Snowflake’s AI Data Cloud with AWS cloud infrastructure, including integrations with AWS services such as Amazon Simple Storage Service (Amazon S3), AWS Glue, Amazon SageMaker, and Amazon Bedrock. With over 50 native integrations between AWS services and Snowflake, organizations can build compliance workflows that maintain data security while accelerating time to value.
This post demonstrates that integration in action by automating one of the most labor-intensive workflows in financial services: anti-money laundering (AML) alert triage. You will build a triage workflow using Amazon Quick Flows and Snowflake Cortex, connected through the Amazon Quick Model Context Protocol (MCP) integration. In our testing environment, automated workflows built using Amazon Quick reduced alert investigation time from 30-90 minutes to under 5 minutes. Actual results may vary based on alert complexity and data volume.
As AI adoption matures, organizations are finding that the highest-impact deployments go beyond standalone assistants. They are repeatable workflows that orchestrate across tools teams already use, turning multi-step manual processes into a one-click experience. Amazon Quick is an enterprise AI service that provides generative AI-powered chat agents, research capabilities, Quick Flows for task automation, and Amazon Quick Automate for process automation, aggregating data from multiple sources including native indexes, custom knowledge bases, and user-uploaded files. Quick Flows, part of Amazon Quick, translates user requests into standardized MCP protocol (an open protocol standard) calls, removing the need for custom connectors while maintaining enterprise security through OAuth authentication. Quick Flows is a strong fit for AML triage because the investigation follows the same structured steps every time: collect input, run investigation, and produce output. The same MCP-based approach applies to repeatable workflows where teams currently bridge systems manually, such as FinOps cost triage, SRE incident response, or compliance investigations.
AML analysts at mid-to-large banks typically spend 30 to 90 minutes per alert manually gathering data and writing disposition narratives. According to industry research, financial institutions typically find that 90-95% of AML alerts are false positives, making efficient triage critical. Manual investigation processes at this scale can create significant workloads for compliance teams. Automation lets analysts process alerts more efficiently, reduce investigation time, and maintain compliance standards.
Solution overview
The following diagram illustrates the end-to-end integration architecture connecting Amazon Quick to Snowflake through the Model Context Protocol (MCP).
Figure 1: Integrating Snowflake-managed MCP server with Amazon Quick through Model Context Protocol
The solution uses Amazon Quick Flows as the orchestration layer, with a connection managed by Amazon Quick to reach a Snowflake Cortex Agent through a Snowflake-managed MCP server with OAuth authentication. The Cortex Agent performs the investigative work, analyzing both structured transaction data through Cortex Analyst and unstructured compliance documents through Cortex Search, while Quick Flows handles input validation, reasoning logic, and formatted output presentation.
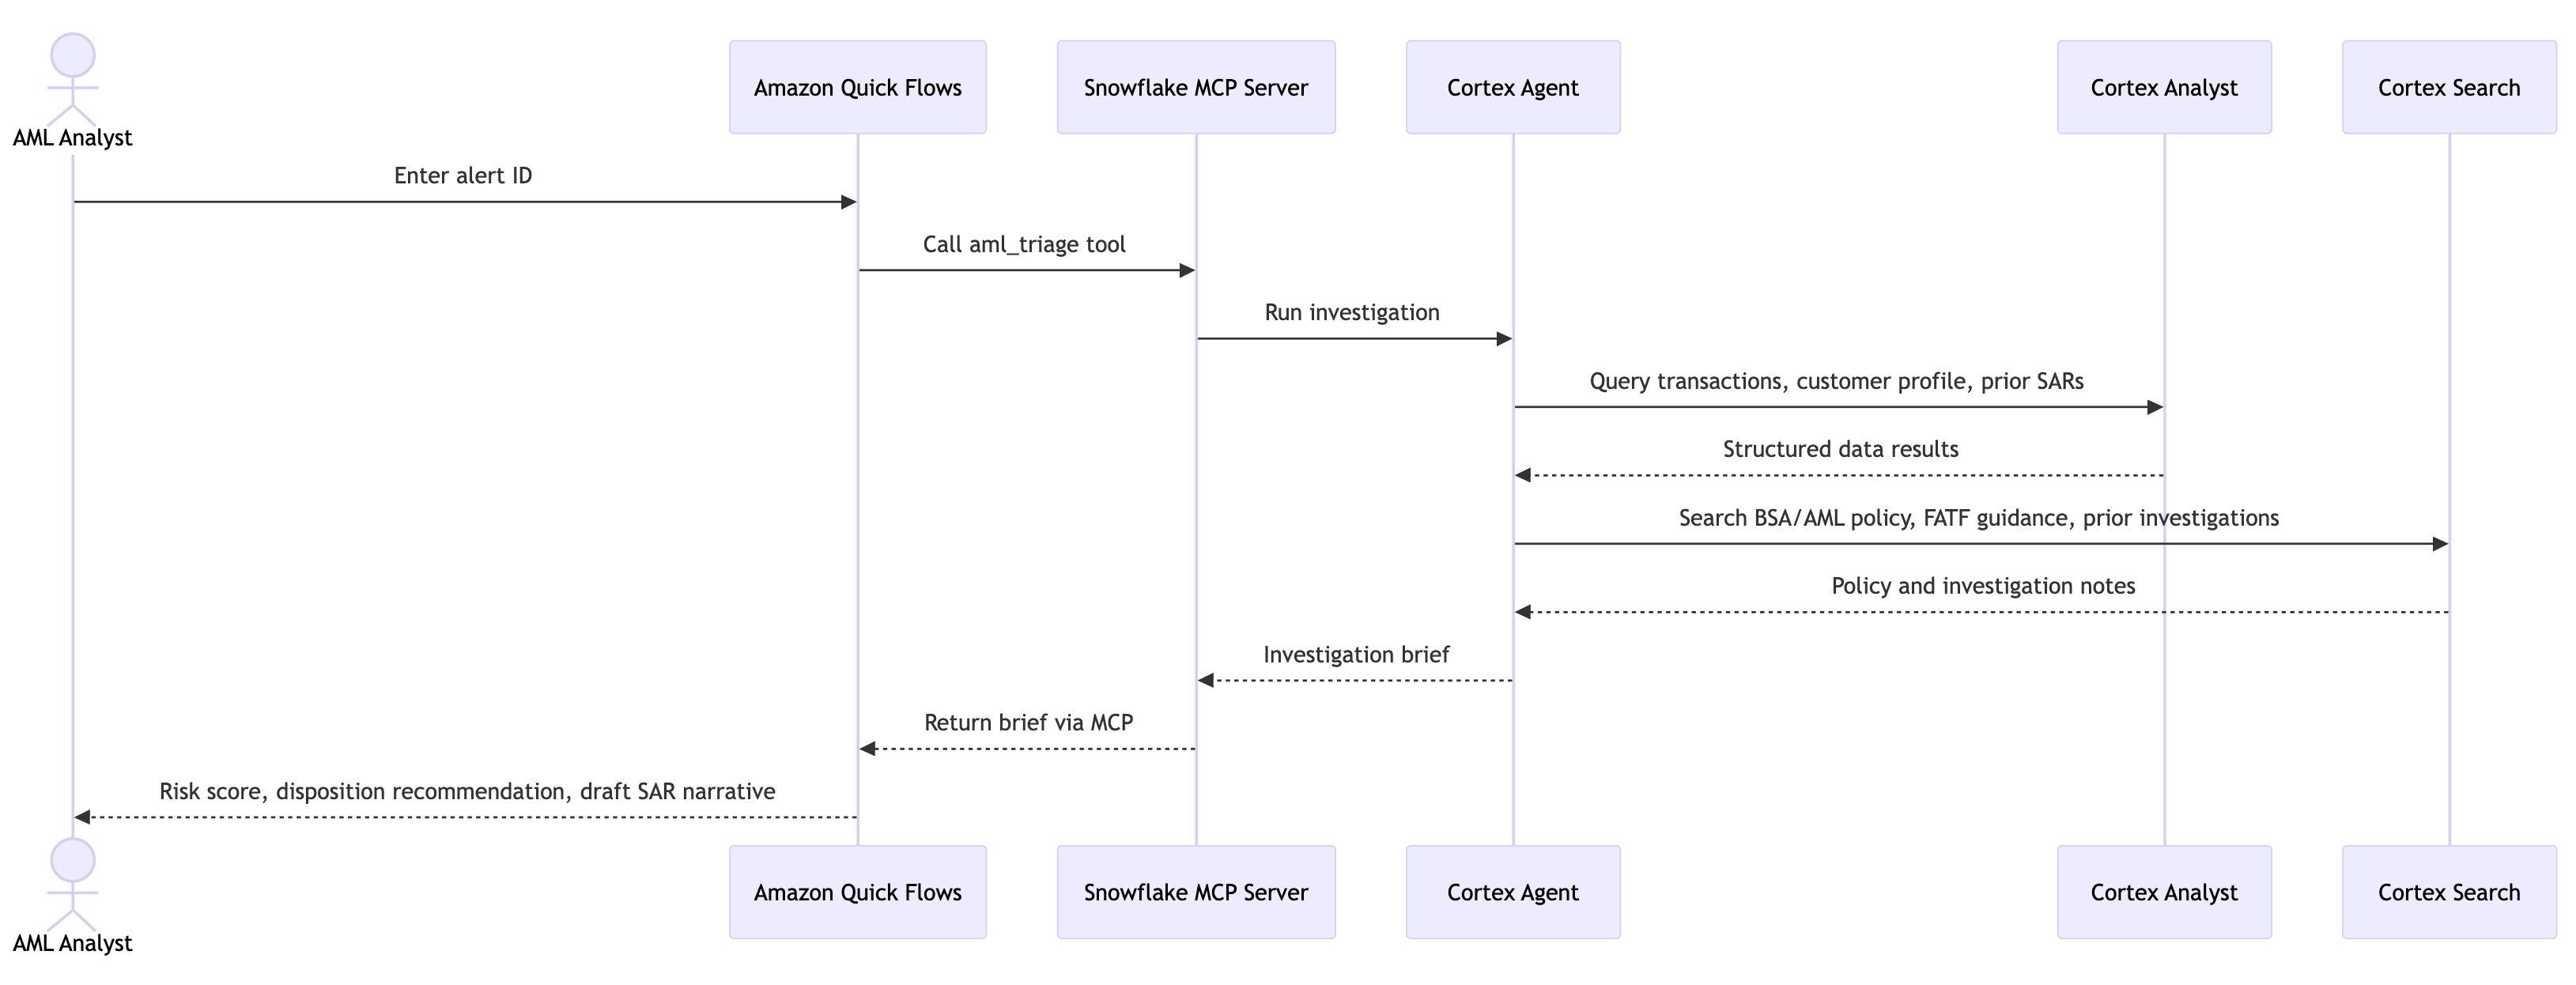
Figure 2: AML alert triage workflow: Amazon Quick Flows with MCP action steps calling Snowflake Cortex Agents (Cortex Analyst and Cortex Search)
The following is the end-to-end analyst experience, from a Quick Flow input step to a completed investigation brief. The analyst opens the published flow, enters the alert ID (for example, ALT-2026-03-02-002), and optionally specifies a time window. The flow then:
- Validates the input and confirms the alert exists.
- Calls the Snowflake Cortex Agent through MCP to investigate the alert across transaction data, customer profiles, prior history, and compliance policy.
- Produces a structured investigation brief: alert summary, transaction pattern, customer profile, prior SARs, policy references, risk score, disposition recommendation, and a draft narrative.
Implementation
In this section, we walk you through the steps to build the AML triage workflow, from preparing your Snowflake data layer to configuring the Quick Flows orchestration. We start with the prerequisites you need before you begin, and each step builds on the last, so by the end you will have a fully functional, end-to-end automated investigation pipeline ready for analyst use.
Prerequisites
- An Amazon Quick account with the ability to configure an MCP action connector.
- A Snowflake account with access to Cortex Agents, Cortex Search, and the Snowflake-managed MCP server feature. You need permissions to create
AGENT,MCP SERVER,CORTEX SEARCH SERVICE, andSECURITY INTEGRATIONobjects. - AML data in Snowflake. Transaction monitoring alerts (from your TMS such as Actimize, Norkom, or in-house rules engine), customer/account master data, and KYC/CDD records. A semantic view that models your alert, transaction, customer, and disposition dimensions.
- Compliance document corpus in Snowflake. BSA/AML policy manual, SAR filing guidelines, prior investigation notes, and regulatory guidance (FinCEN advisories, FFIEC BSA/AML manual excerpts) loaded into a table for Cortex Search indexing.
- Familiarity with SQL, Snowflake administration, and AWS Identity and Access Management (IAM) concepts.
Step 1: Prepare the AML semantic view (Snowflake)
Cortex Analyst works best when you give it a semantic view that matches how your compliance team thinks about alerts and investigations. The Snowflake-managed MCP server supports semantic views with Cortex Analyst. Navigate to Snowsight, then AI & ML, then Semantic Views, and create a semantic view over your AML tables (dimensions and measures) in Snowflake:
- Alert metadata: alert_id, alert_date, rule_name, rule_category, severity, status, alert_score.
- Transaction details: txn_id, txn_date, txn_type, amount, currency, channel, originator, beneficiary, beneficiary_country.
- Customer profile: customer_id, full_name, risk_rating, country, industry, onboarding_date, pep_flag, sanctions_flag.
- Account activity: account_id, account_type, current_balance, avg_monthly_volume, status.
- Disposition history: prior alerts, prior SARs, last disposition outcome, analyst notes.
Define relationships (joins) between alerts, transactions, customers, accounts, and dispositions so the agent can traverse the data model in a single query.
Step 2: Build the Cortex Search service for compliance documents (Snowflake)
AML triage relies heavily on unstructured context. Create a Cortex Search service over your compliance document corpus so the agent can retrieve relevant policy sections, SAR filing templates, and prior investigation notes during each triage.
The documents to index include your institution’s BSA/AML policy manual, SAR filing thresholds and narrative templates, FinCEN advisories, FFIEC BSA/AML manual excerpts, prior investigation notes (redacted as needed), and sanctions/PEP screening guidance.
Step 3: Create the AML triage Cortex Agent (Snowflake)
Create a Cortex Agent that orchestrates across your transaction semantic view (Cortex Analyst) and compliance document search service (Cortex Search). The agent specification includes a system instruction block that encodes your institution’s investigation methodology. This block is intentional and expected to be customized. The default instructions provided here reflect a common AML triage workflow, but you should adapt them to match your organization’s specific procedures, escalation criteria, and regulatory obligations before deploying to production.
Review the numbered steps in the system instruction block and reorder or remove steps that do not apply to your workflow. Add institution-specific context such as your jurisdiction and applicable regulatory frameworks. Update the response format block to match your case management system’s expected output structure. Update the sample_questions block with representative alert IDs or query patterns from your own environment to help validate agent behavior during testing.
Keep the orchestration budget conservative so the agent completes well within the Amazon Quick MCP timeout constraints (currently 300 seconds). Once the agent is created, go to Snowsight and update the default warehouse to be used for the Cortex Analyst tool.
Step 4: Create the Snowflake-managed MCP server
Snowflake Cortex Agents are not automatically exposed to external MCP clients. Create an MCP SERVER object that lists the tools you want Amazon Quick to discover.
Step 5: Set up Snowflake OAuth for Amazon Quick
Amazon Quick supports OAuth for MCP integrations. Snowflake’s managed MCP server supports OAuth 2.0 but does not support Dynamic Client Registration, so you will use the manual configuration option in Amazon Quick.
- In Snowflake, create a
SECURITY INTEGRATIONof typeOAUTHand register the Amazon Quick redirect URL.Confirm the exact URL for your deployment region in the Amazon Quick console and accordingly update the value for
OAUTH_REDIRECT_URIin the preceding command. - Run the following command to retrieve the client ID and client secret:
Note down the values for
OAUTH_CLIENT_IDandOAUTH_CLIENT_SECRET. - Run the following command to retrieve values for Snowflake OAuth endpoints:
Note down the values for
OAUTH_AUTHORIZATION_ENDPOINTandOAUTH_TOKEN_ENDPOINT.
Step 6: Apply least-privilege access control (Snowflake)
Create a dedicated role for Amazon Quick MCP access. Grant USAGE on the MCP server and the underlying tools. Access to the MCP server does not automatically grant access to the tools it exposes.
Step 7: Register the Snowflake MCP server in Amazon Quick
In the Amazon Quick console, navigate to Connectors and choose the Connect to your team tab. Select the plus (+) icon on the Model Context Protocol tile to begin setup (Figure 3).
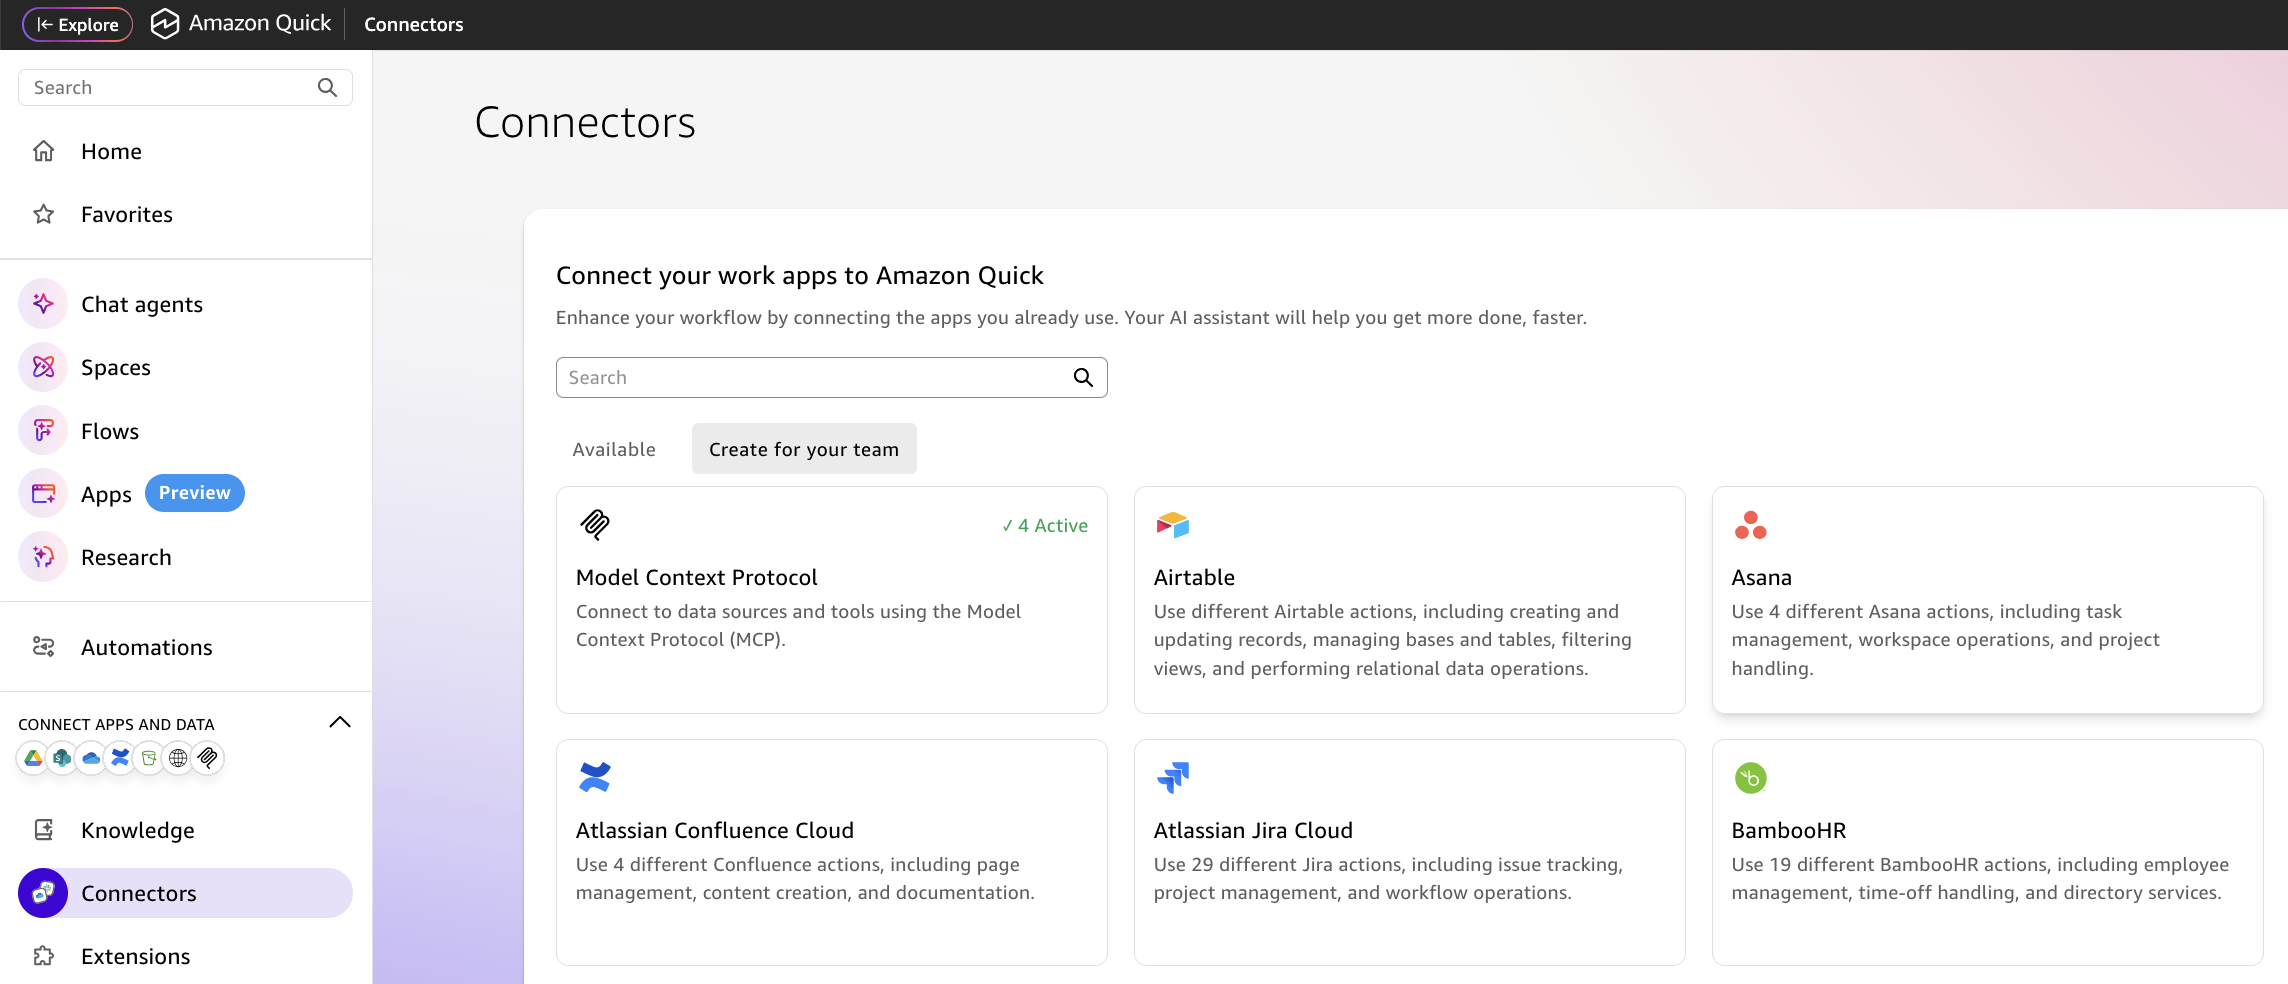
Figure 3: Amazon Quick Connectors page: selecting the Model Context Protocol tile to add a new MCP integration
Enter the Snowflake MCP server endpoint:
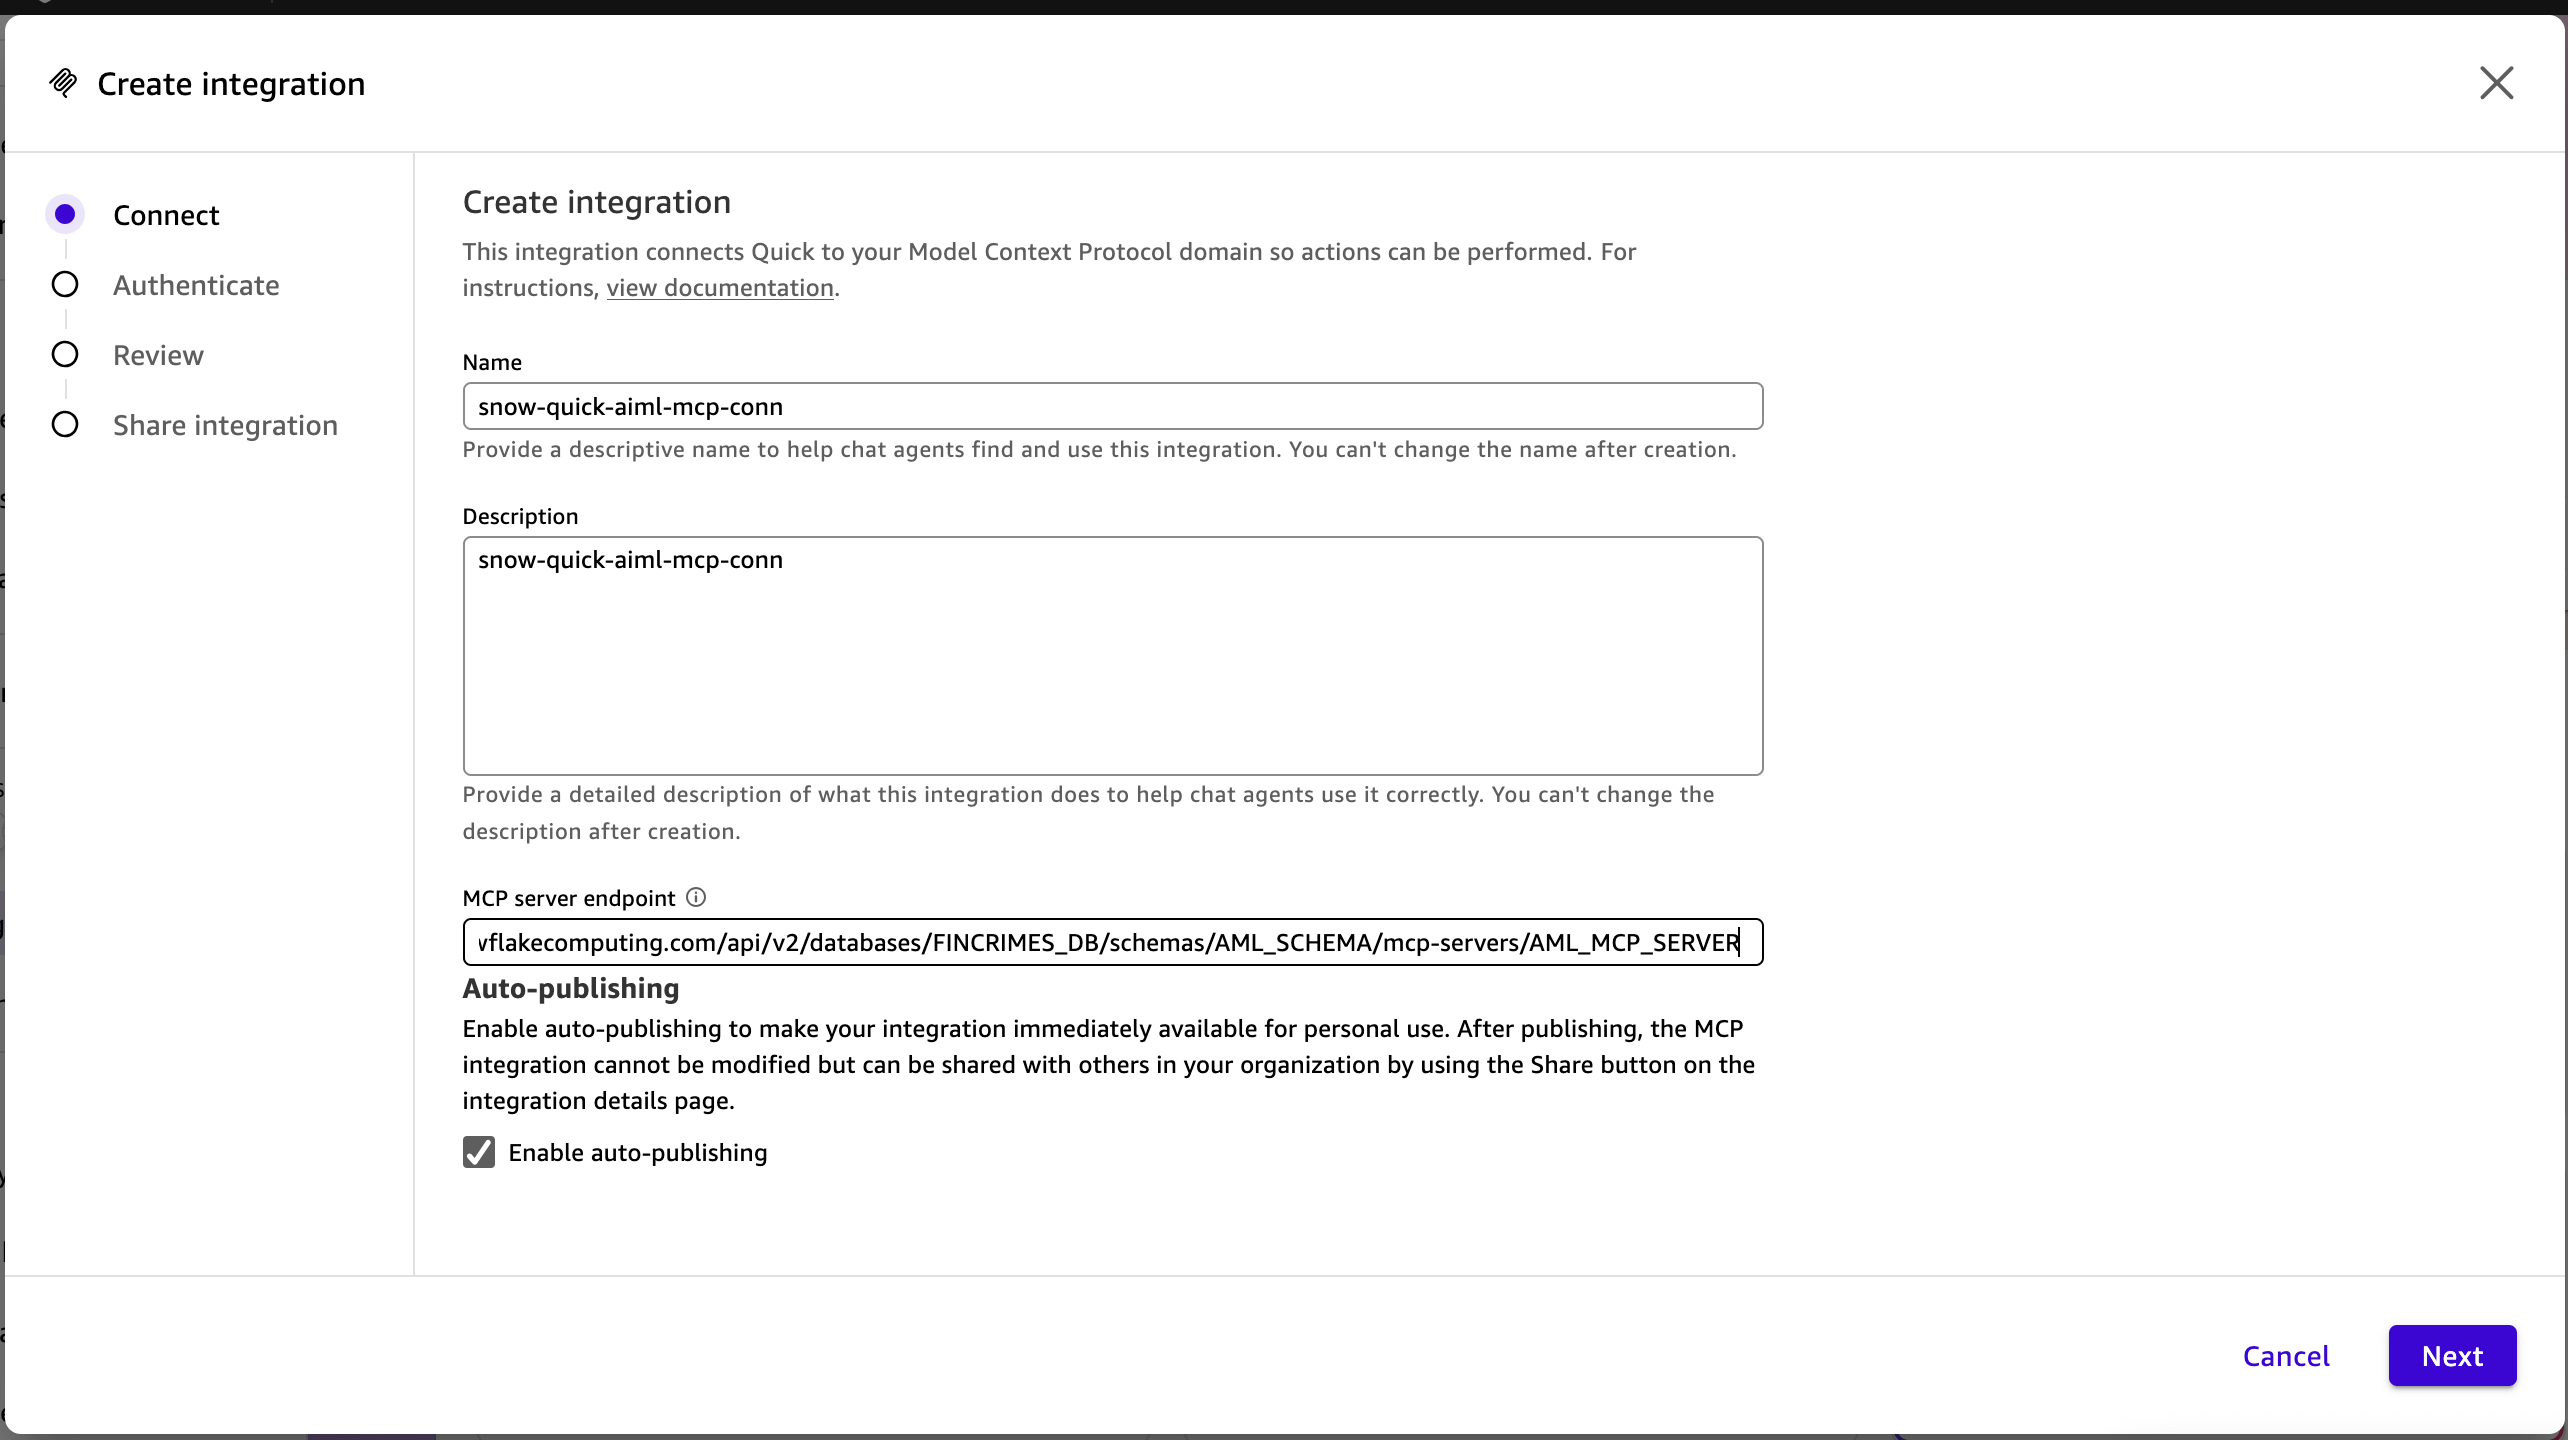
Figure 4: Amazon Quick MCP integration: entering the Snowflake MCP server endpoint URL
Choose Next. Select User authentication (OAuth) and choose Manual configuration. Enter the client ID and secret from the Snowflake SECURITY INTEGRATION, plus the Snowflake OAuth authorization and token URLs. Choose Create and continue. Amazon Quick connects to the MCP server and discovers the available tools.
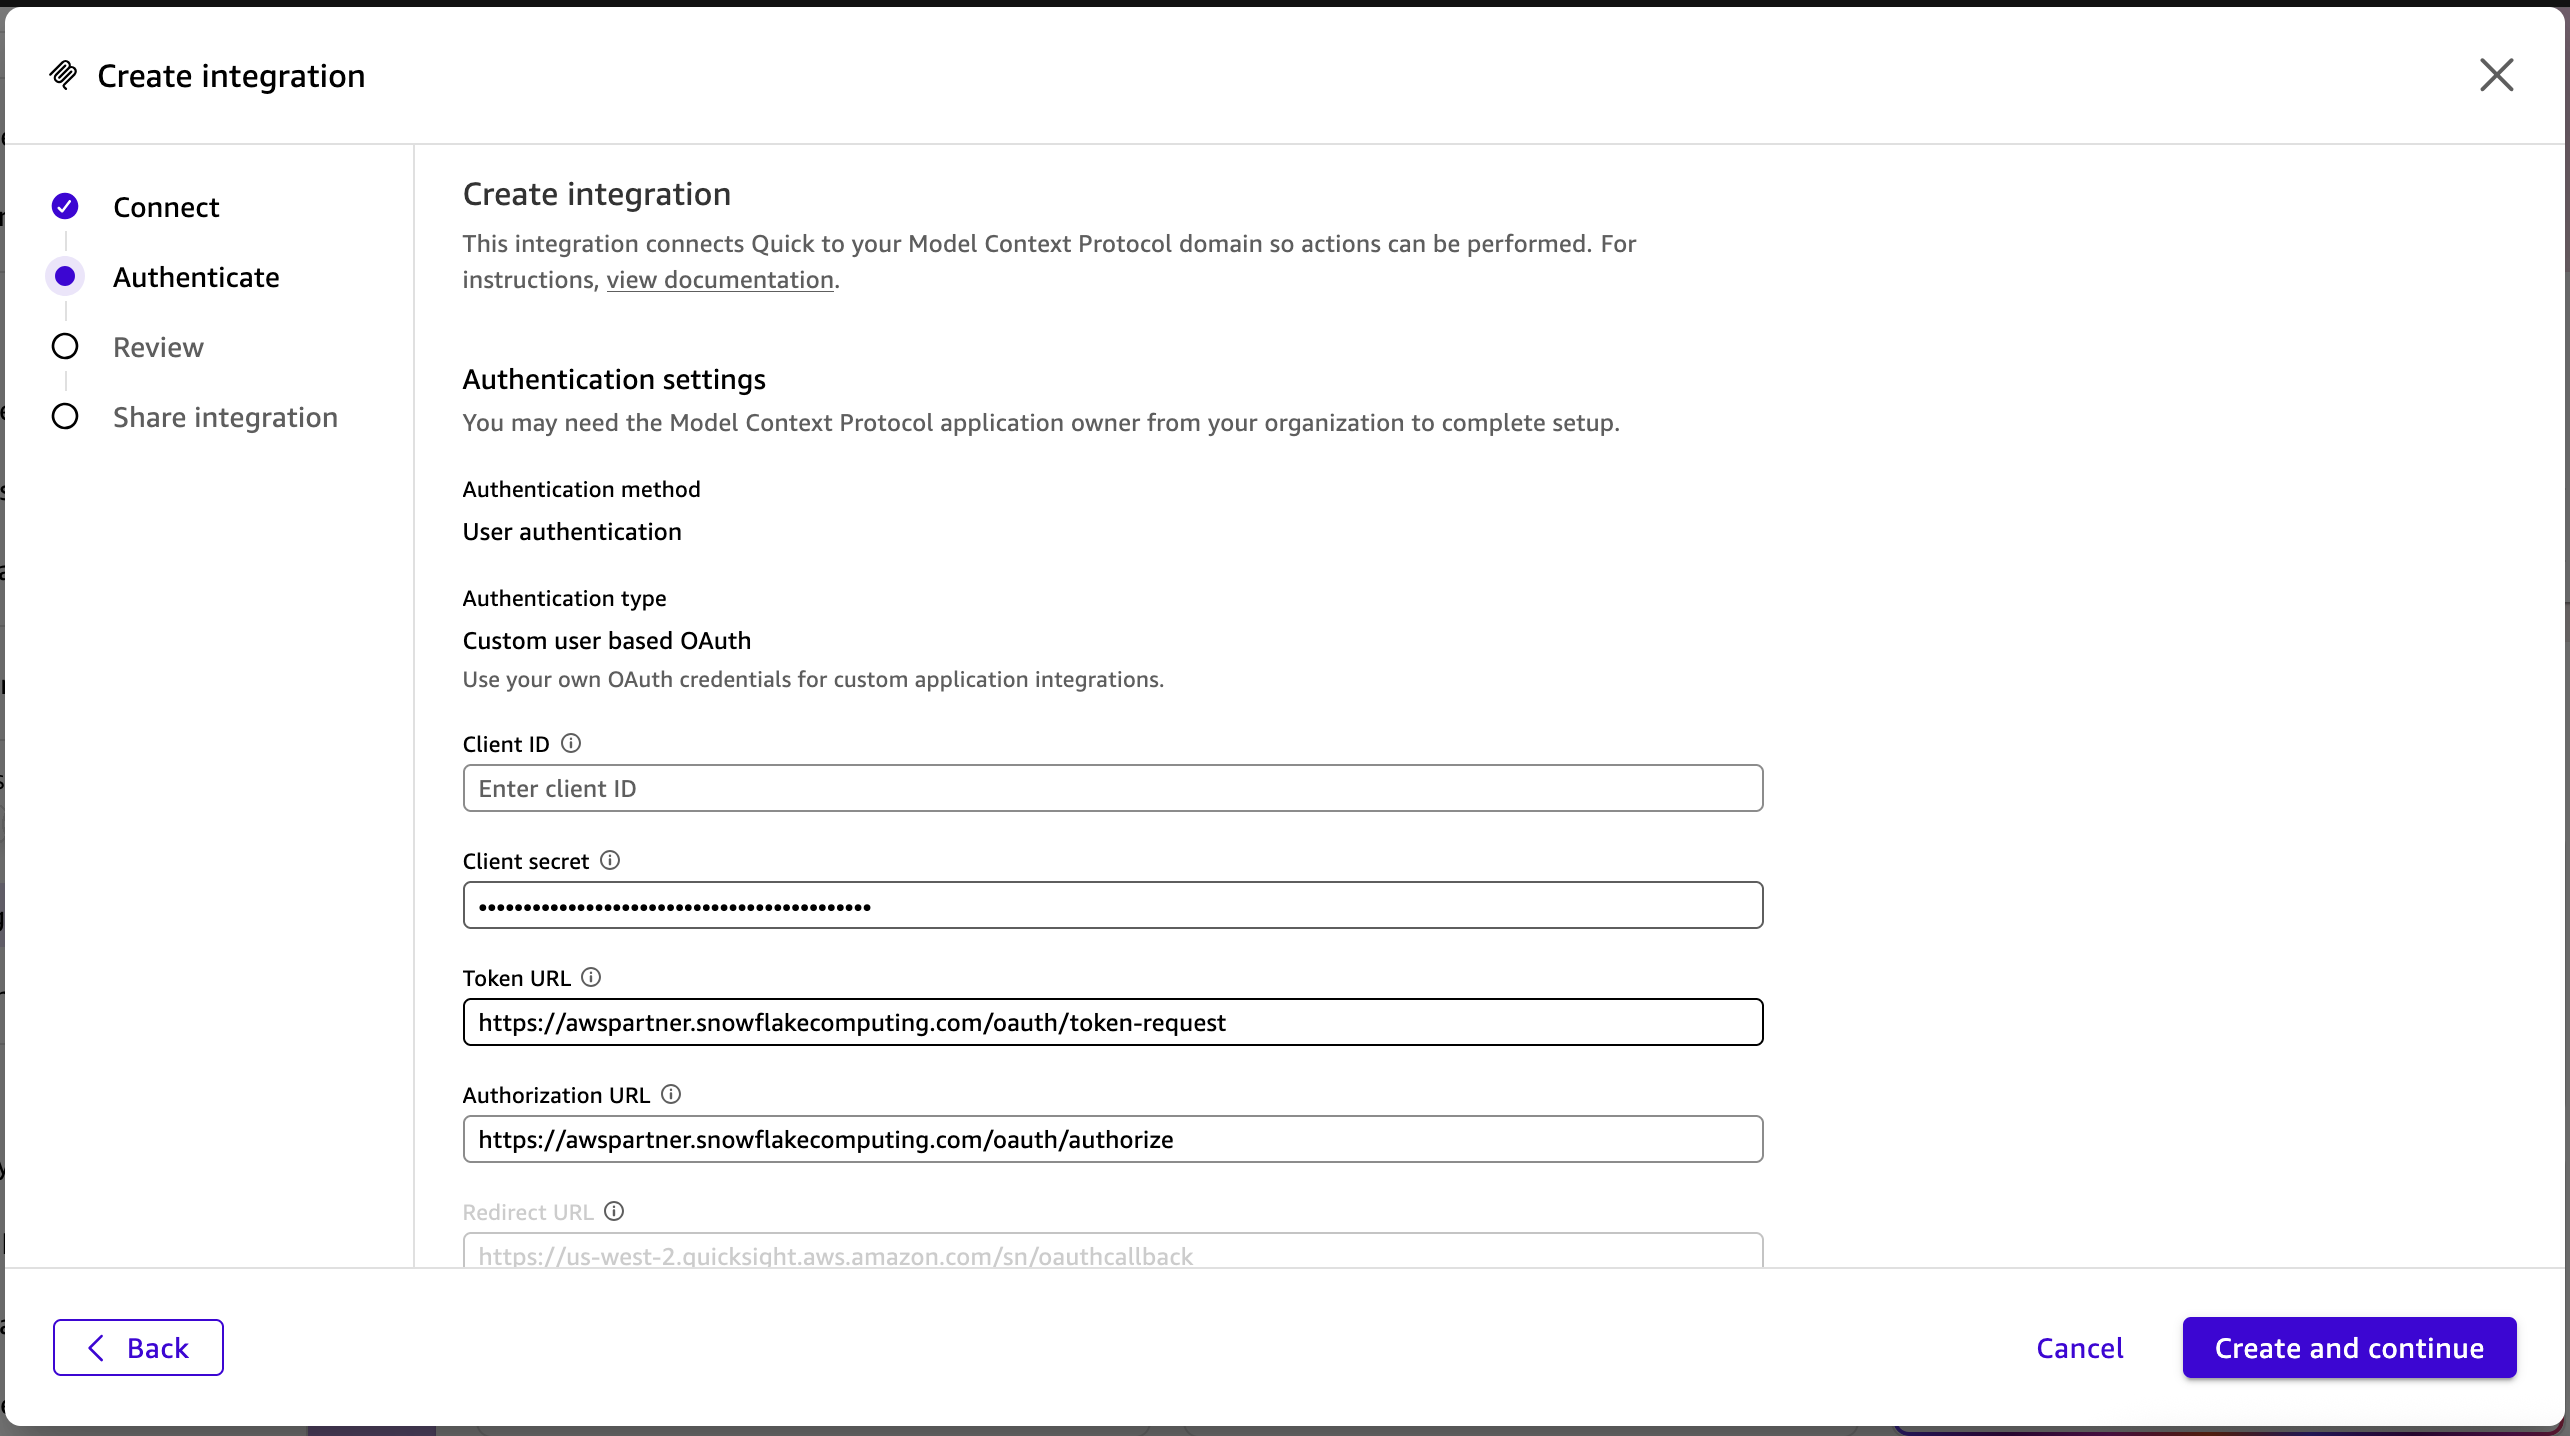
Figure 5: Amazon Quick MCP integration: OAuth manual configuration fields populated with Snowflake credentials
You will need to authenticate to Snowflake using the Snowflake user created in Step 6.
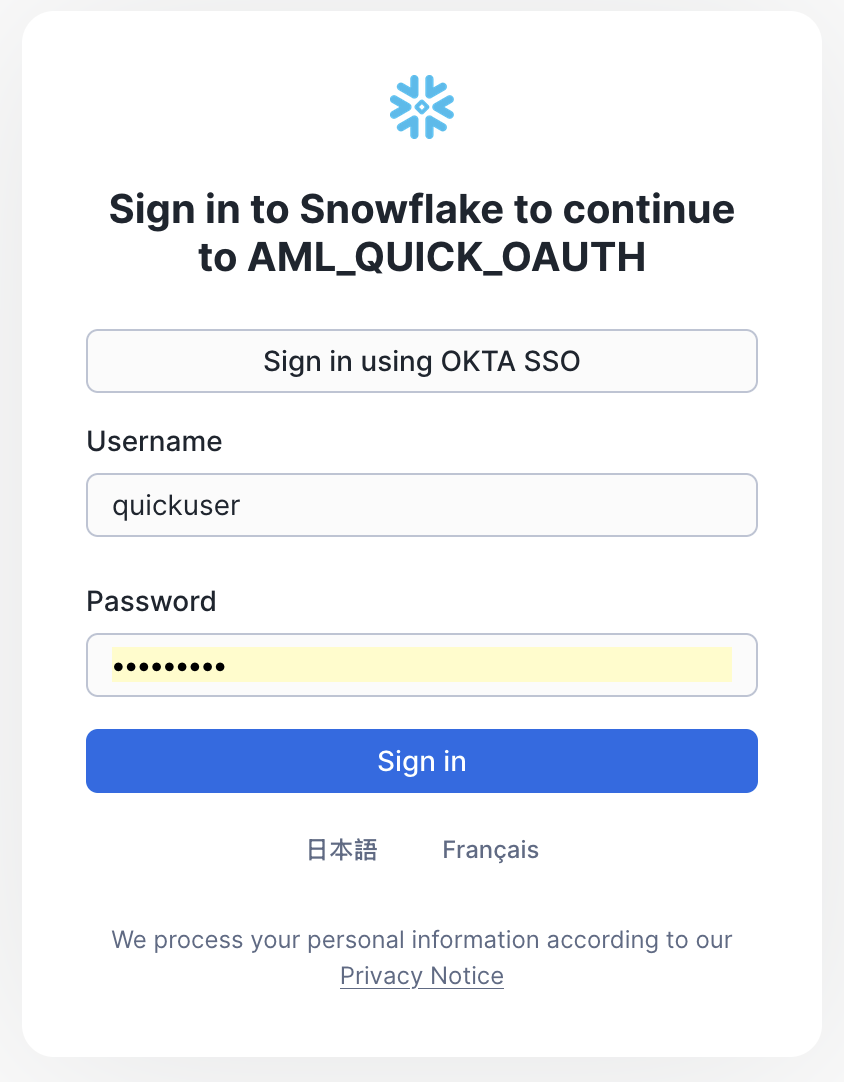
Figure 6: Sign in to Snowflake using your Snowflake credentials
Review the list of discovered actions corresponding to Snowflake-managed MCP server tools (Cortex Agent, Cortex Analyst, Cortex Search) and confirm. These tools do the investigative work, and the Quick Flow invokes them as action steps based on the workflow logic you define.
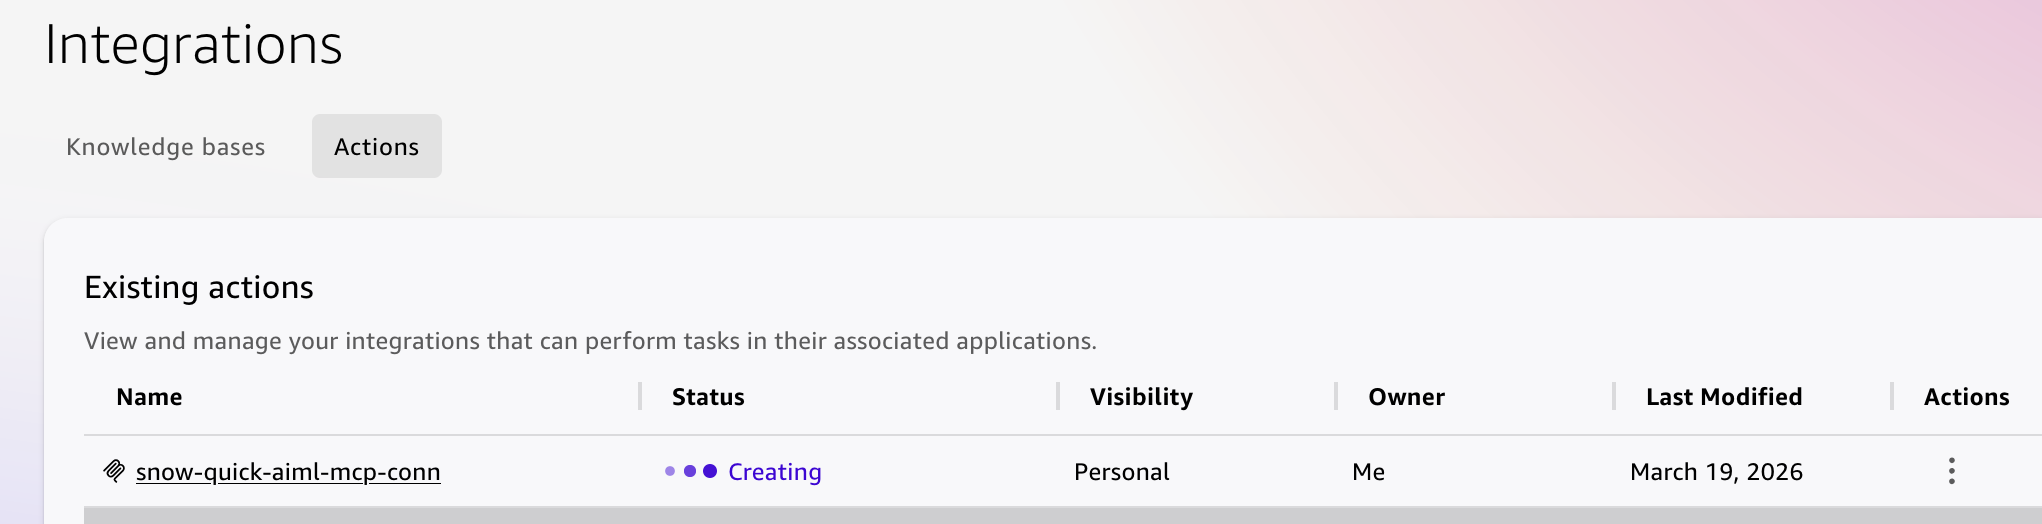
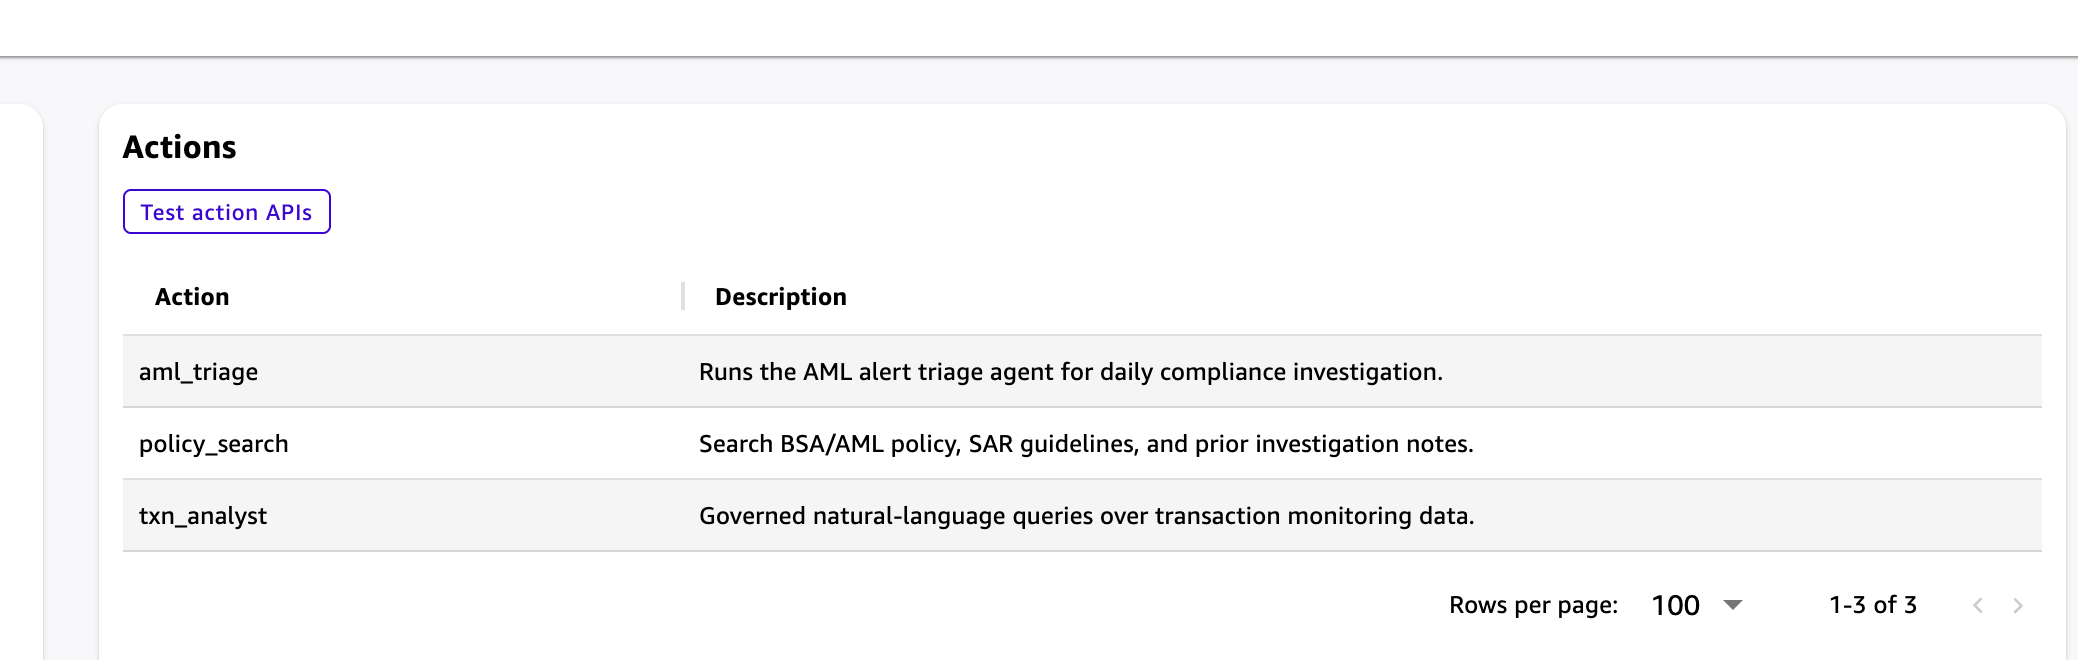
Figure 7: Amazon Quick MCP integration review page showing discovered tools: aml_triage, txn_analyst, and policy_search
Step 8: Build the AML triage Quick Flow
Navigate to Quick Flows and choose Create flow. You can describe the workflow in natural language or build it step by step using the visual editor. The flow consists of four sections: an input step, a reasoning group with MCP action steps, an output step, and optional follow-up chat.
Input step: Collect the alert ID
Add a User input step that prompts the analyst to enter the alert ID (for example, ALT-2026-03-02-002) and an optional time window. This makes the flow repeatable and self-documenting. Every run starts with the same structured input, so there is no prompt variability across analysts.
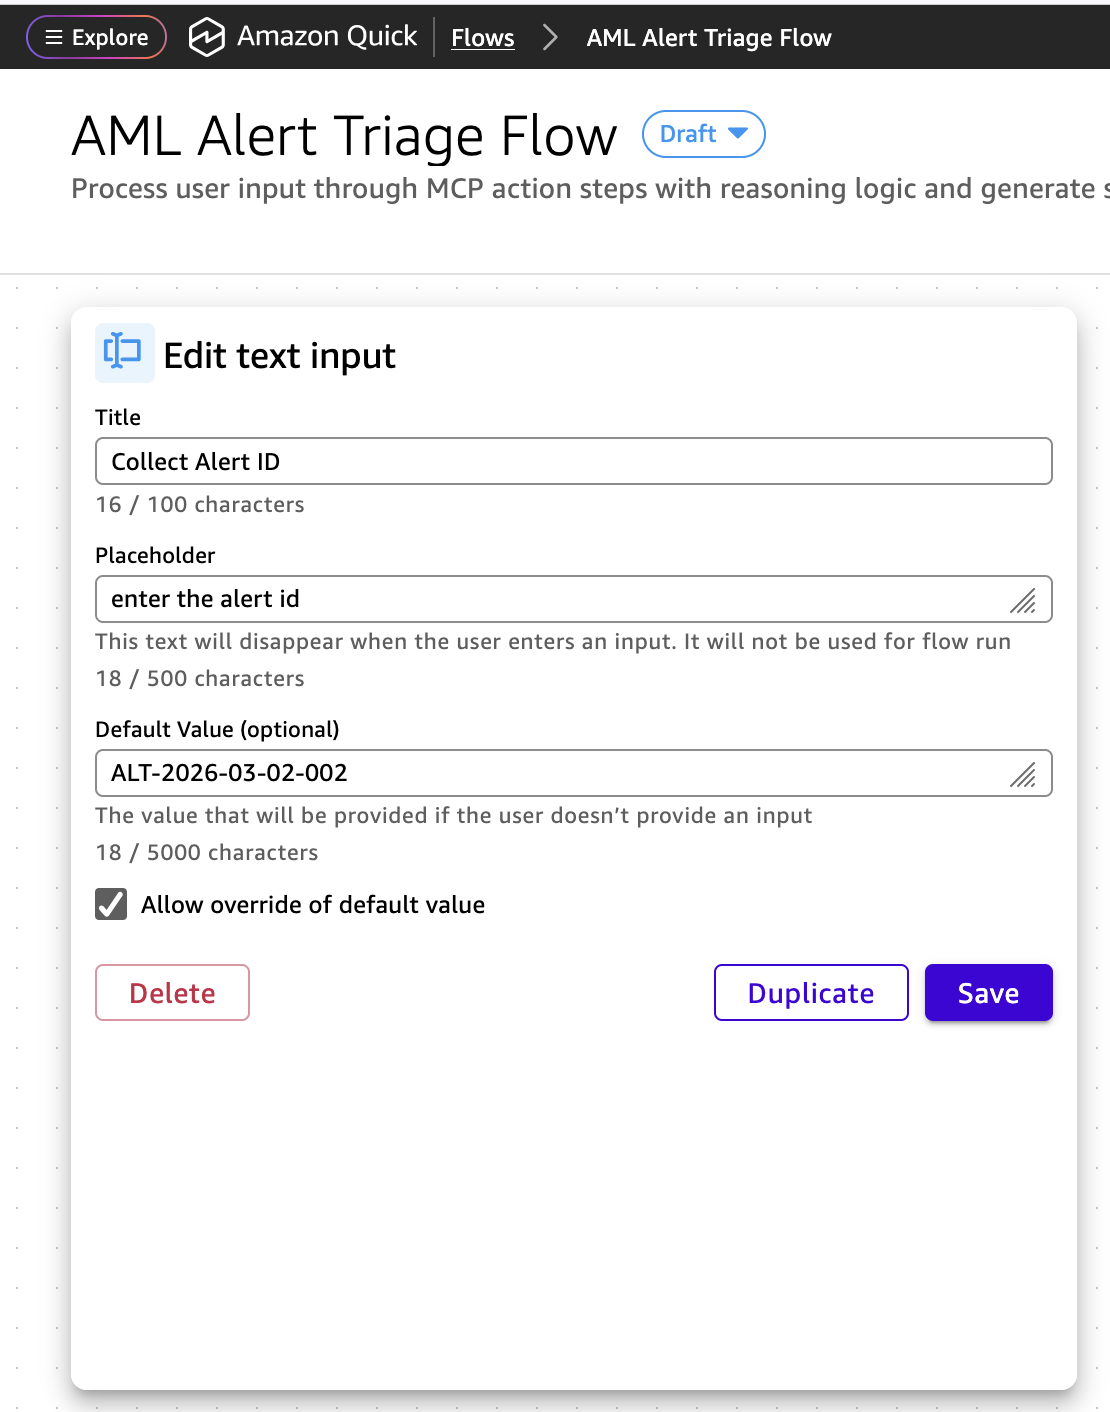
Figure 8: Quick Flow editor: input step configured to collect alert ID and optional time window from the analyst
Reasoning group: Investigate the alert through MCP
Add a Reasoning group that contains the branching logic for investigating the alert. We use a Reasoning group in this example so the flow can support conditional triage paths, such as escalating a CRITICAL alert for immediate BSA Officer review, applying enhanced review for a HIGH_RISK_GEO alert, or recommending escalation when prior SARs are found. If your workflow always runs the same aml_triage action without conditional branching, you can also build this flow without a Reasoning group by placing the Snowflake MCP application action directly after the input step.
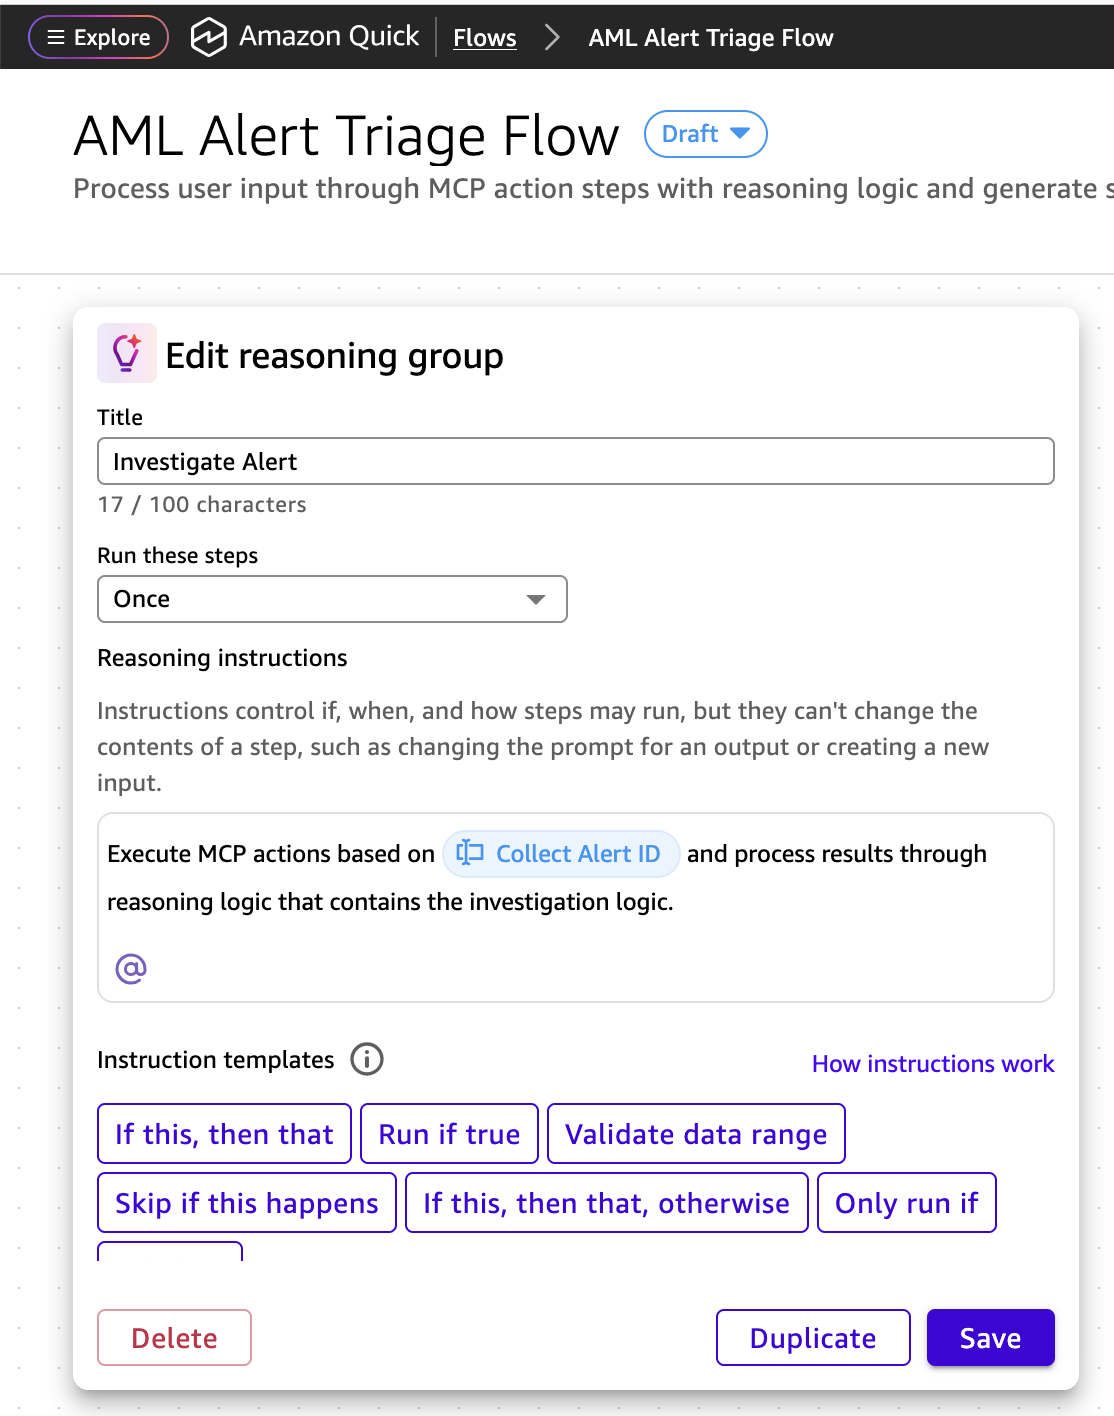
Figure 9: Quick Flow editor: add reasoning group that contains investigation logic
Within the reasoning group, add an Application actions step and select the Snowflake MCP integration you created in Step 7. Choose the aml_triage action. Write the prompt instruction for the action step:
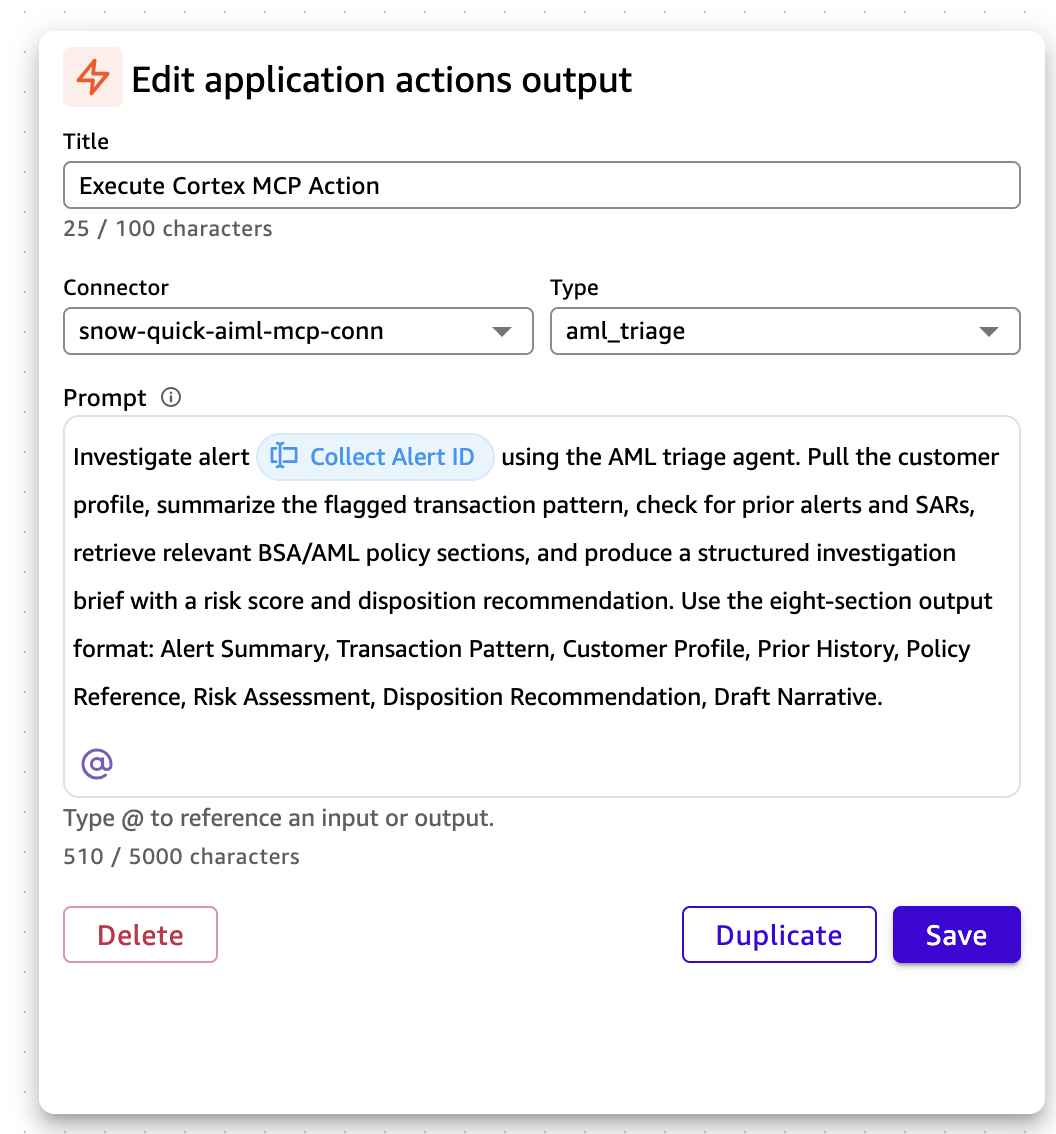
Figure 10: Quick Flow editor: reasoning group with MCP action step calling the aml_triage tool from the Snowflake integration
The default value for the {alert_id} variable is automatically populated from the input step, though you can overwrite it manually. The reasoning group can include additional branching logic using natural-language instructions to handle different alert scenarios.
For a CRITICAL severity alert, the reasoning group instructs the agent to check sanctions lists and flag the case for immediate BSA Officer review. When the alert category is HIGH_RISK_GEO, the agent cross-references beneficiary countries against the current FATF high-risk jurisdictions list and retrieves OFAC screening guidance. If the customer has prior SARs on record, the agent retrieves the prior investigation narrative and recommends escalation rather than closure.
Output step: Present the investigation brief
Add an Output step that formats and presents the investigation brief to the analyst. The output includes all eight sections from the Cortex Agent response. The analyst can review the brief, and because Quick Flows supports agentic runtime, they can chat with the flow to refine outputs.
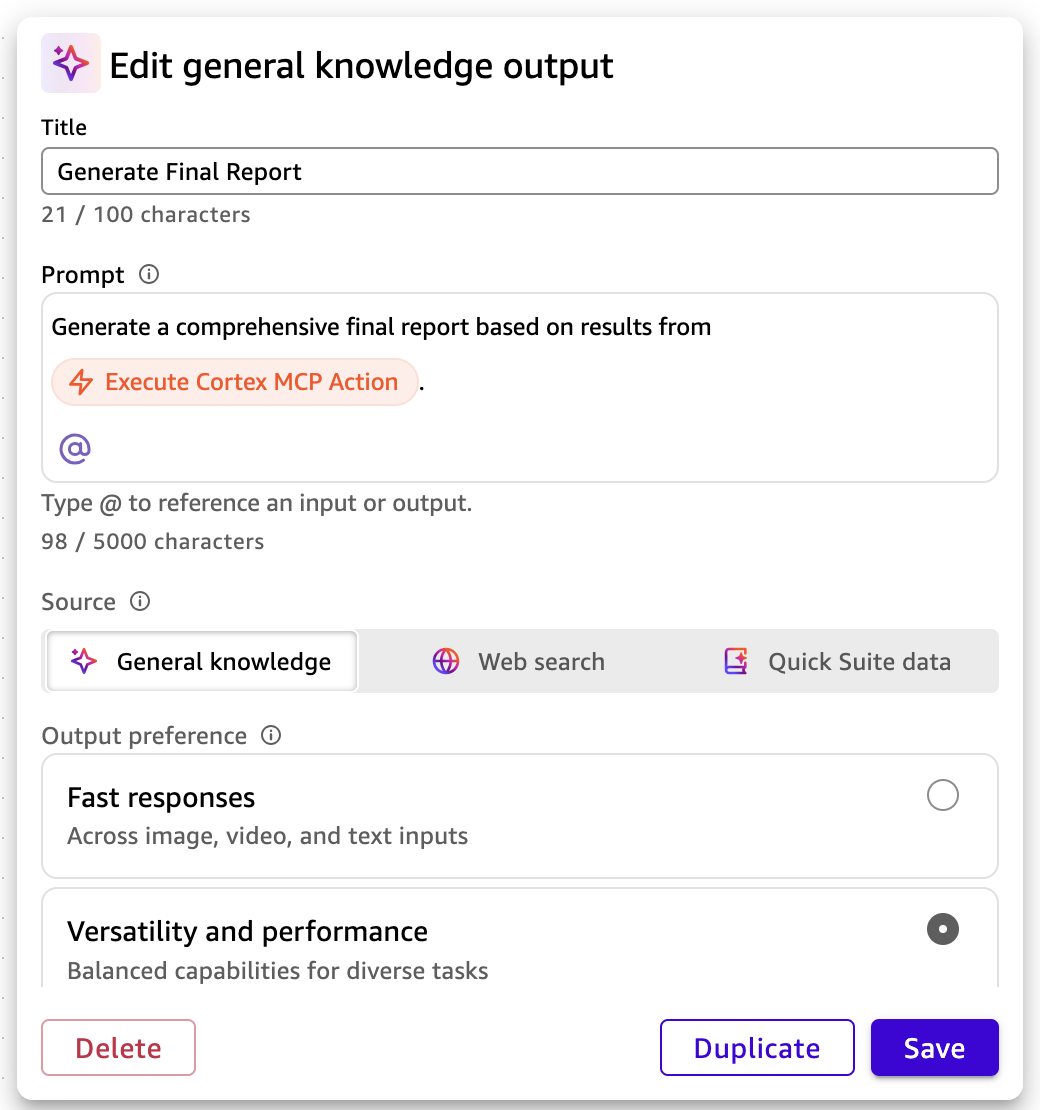
Figure 11: Quick Flow editor: output step showing the formatted investigation brief with all eight sections.
Step 9: Publish and share the flow
Once the flow is tested, choose Share and Publish to make it available in the flow library. Then share it with your compliance team.
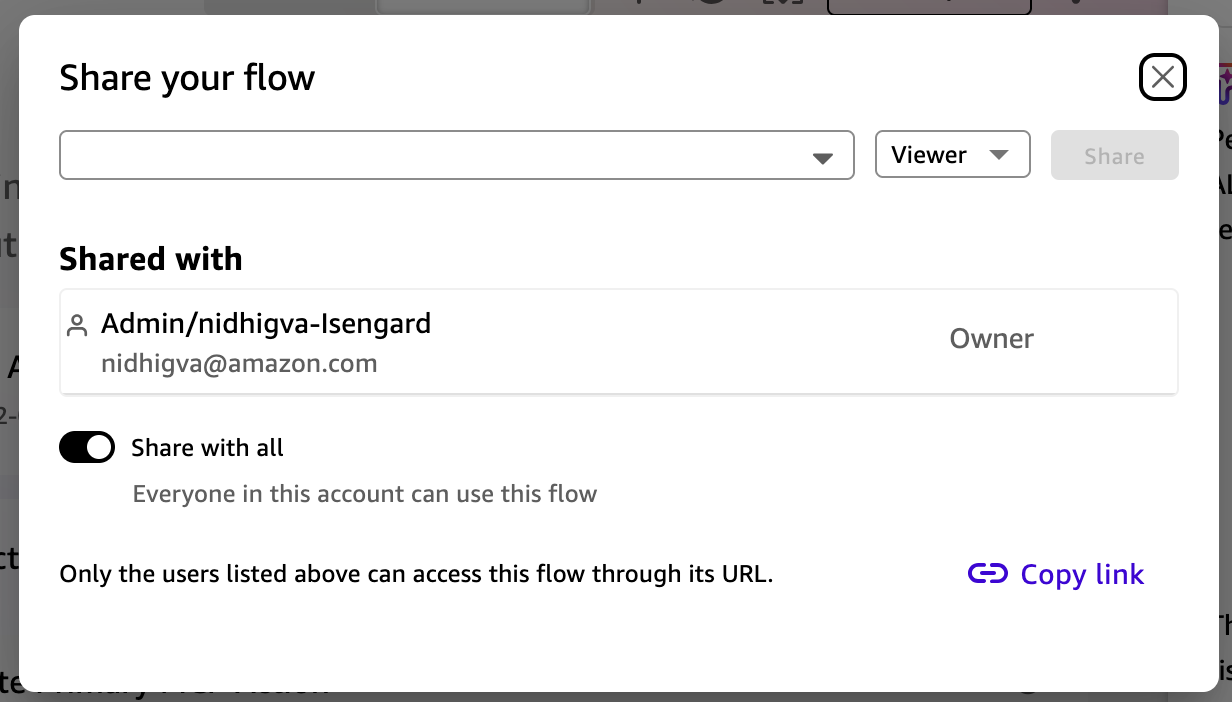
Figure 12: Share and Publish your Quick flow
Analysts can open the flow from the library or invoke it from the Amazon Quick chat interface. Every analyst runs the same structured triage workflow, producing consistent, audit-ready investigation briefs regardless of their prompt-engineering experience.
Step 10: Test the workflow
Open the AML Alert Triage Flow and run it with a test alert. Enter the alert ID, choose the Start button, and let the flow execute. The flow calls the Snowflake Cortex Agent through MCP. The agent orchestrates Cortex Analyst and Cortex Search internally, then returns the structured investigation brief.
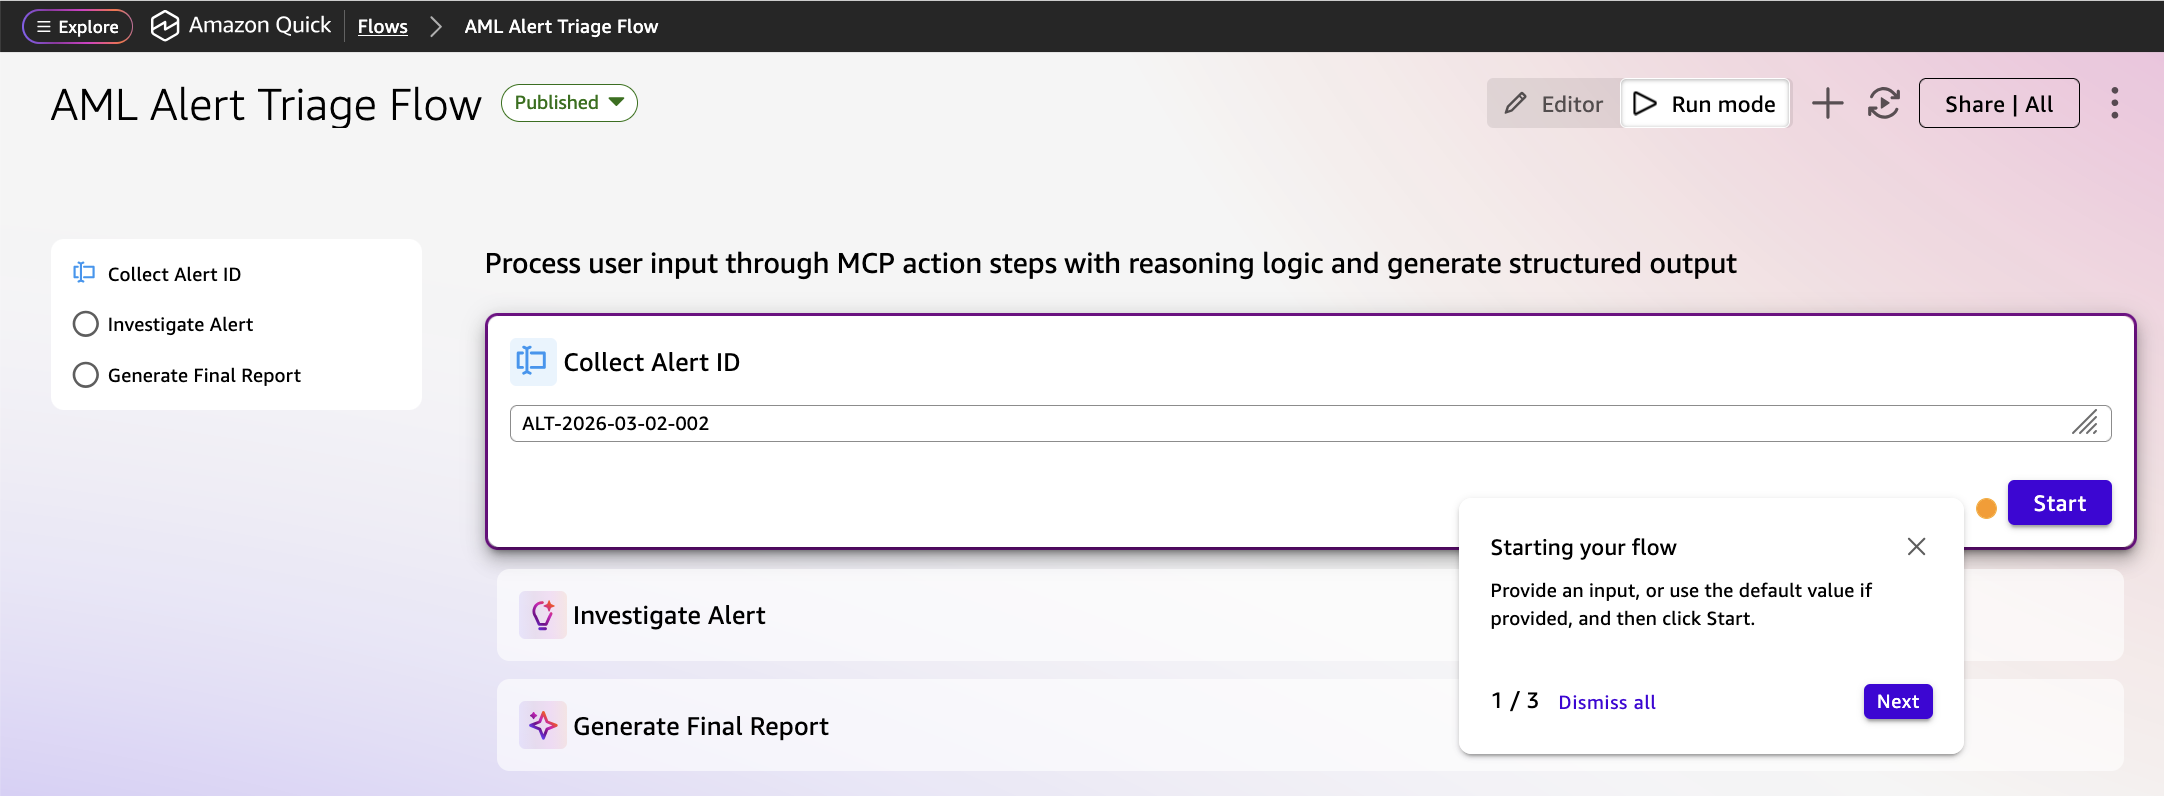
Figure 13: Test the Quick flow
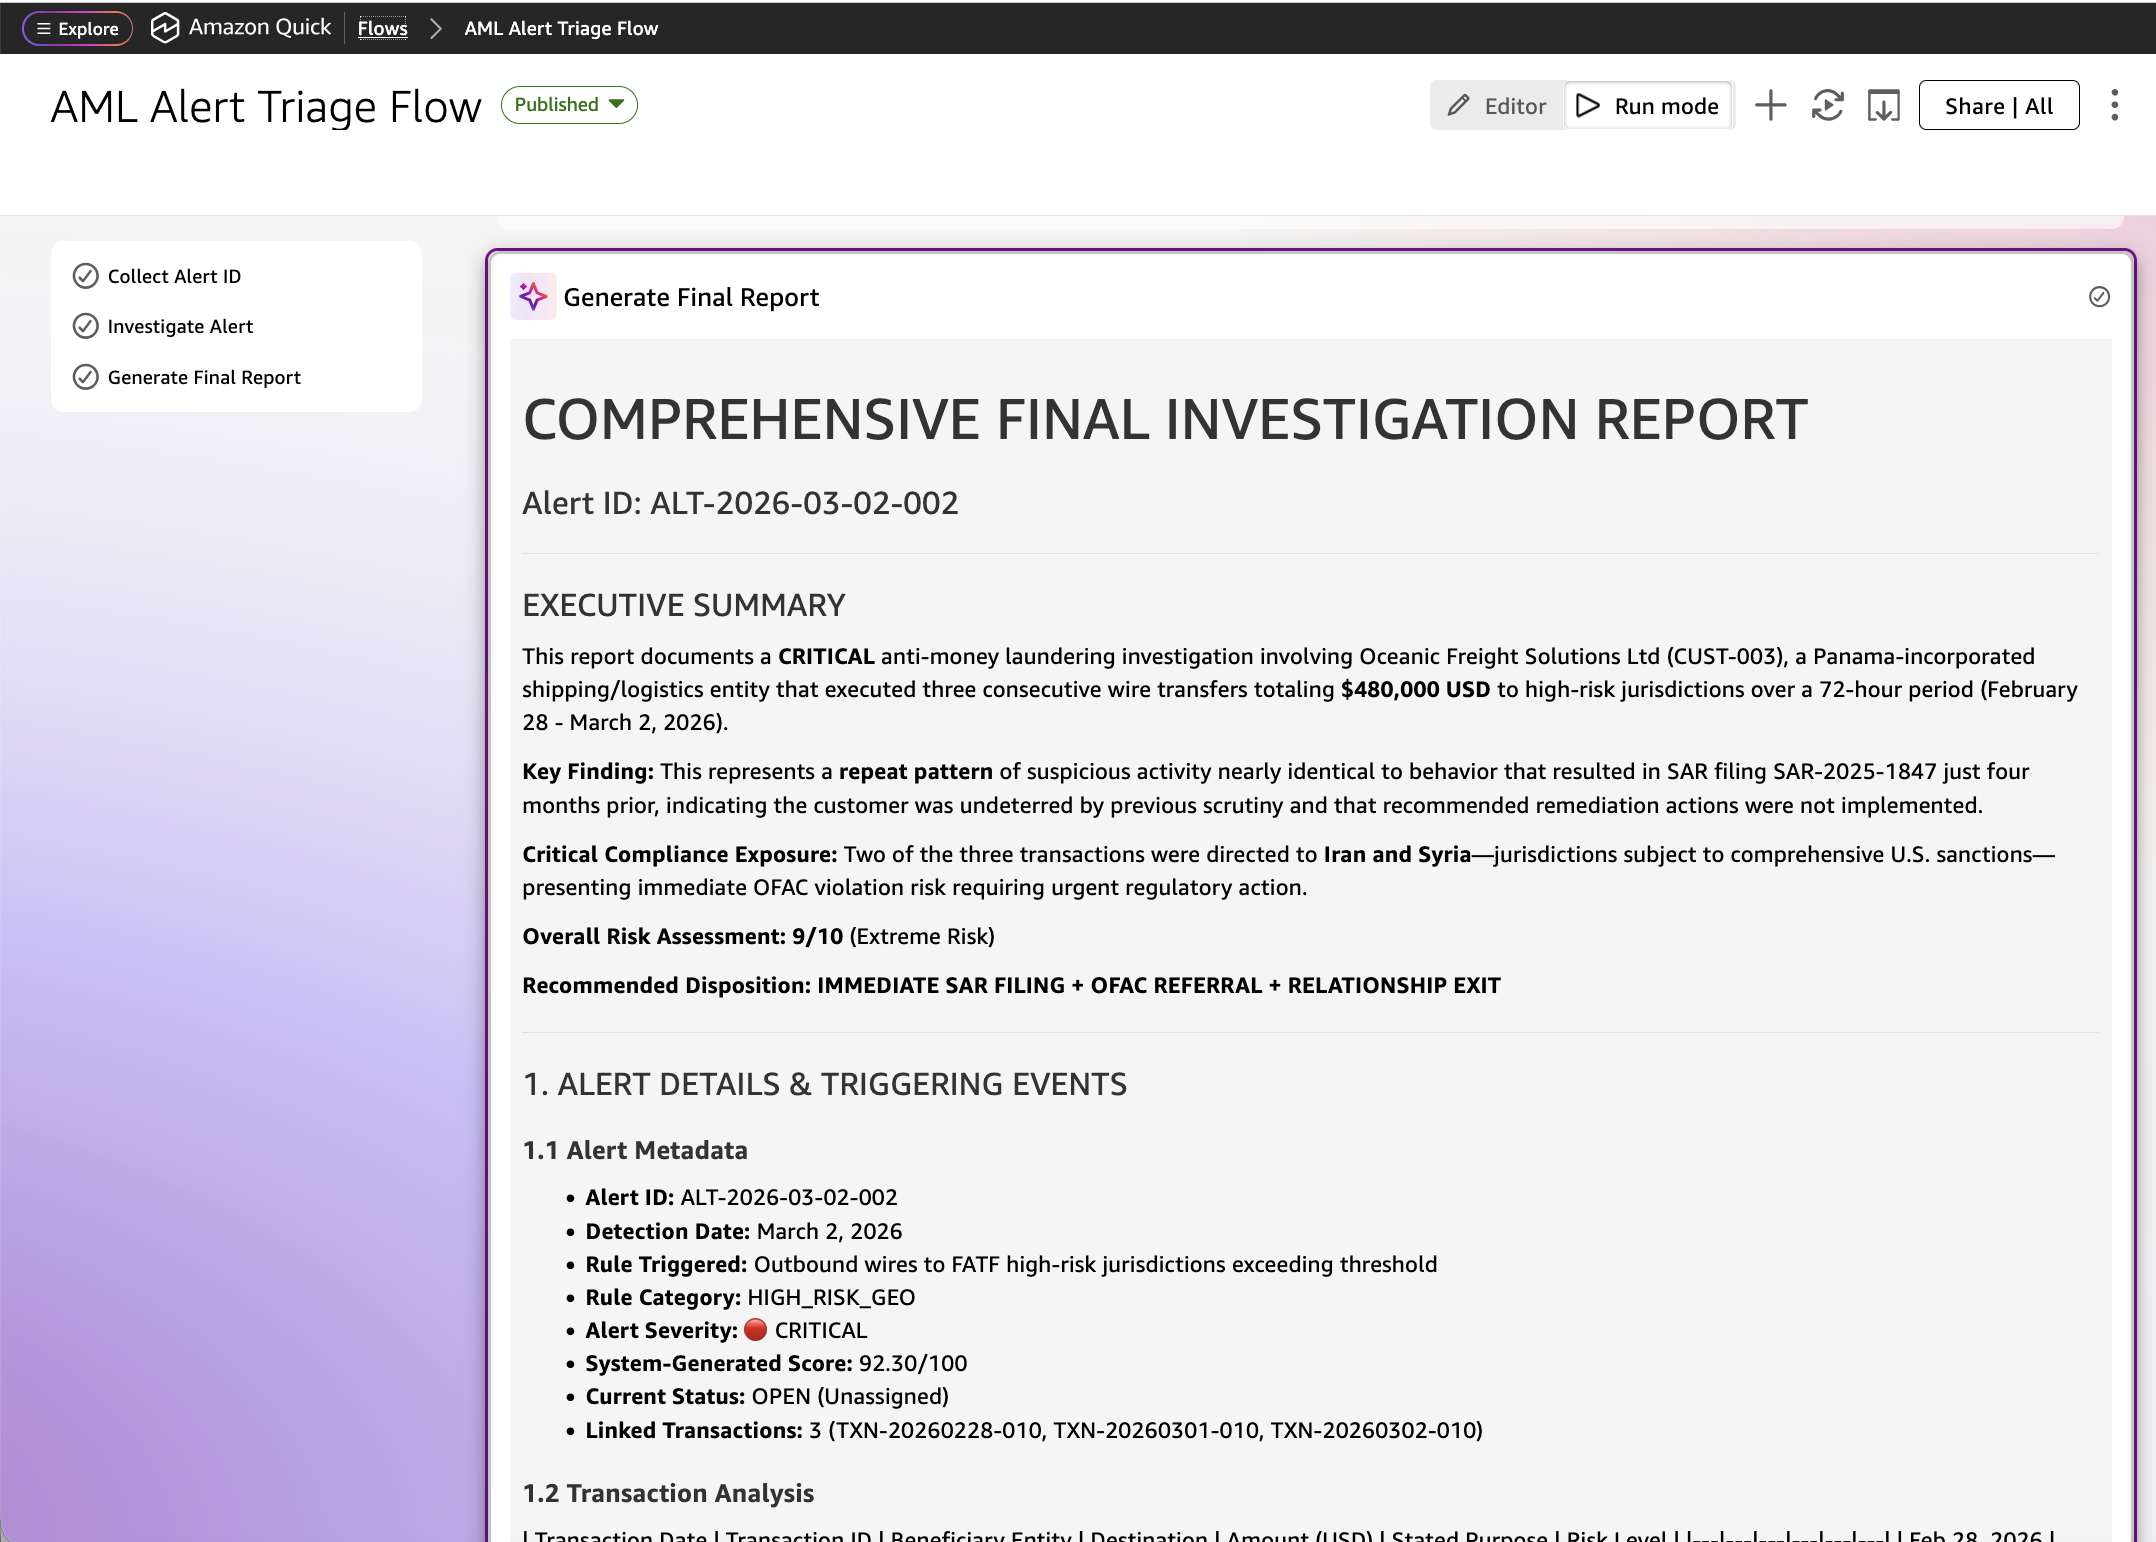
Figure 14: Output generated from AML Triage Quick Flow
After reviewing the brief, the analyst can use the chat interface to ask follow-up questions and refine the output before finalizing. Test the interface with some example questions, such as:
- “Which FATF list are these countries on, call to action or increased monitoring?”
- “What did the previous investigation find for this customer?”
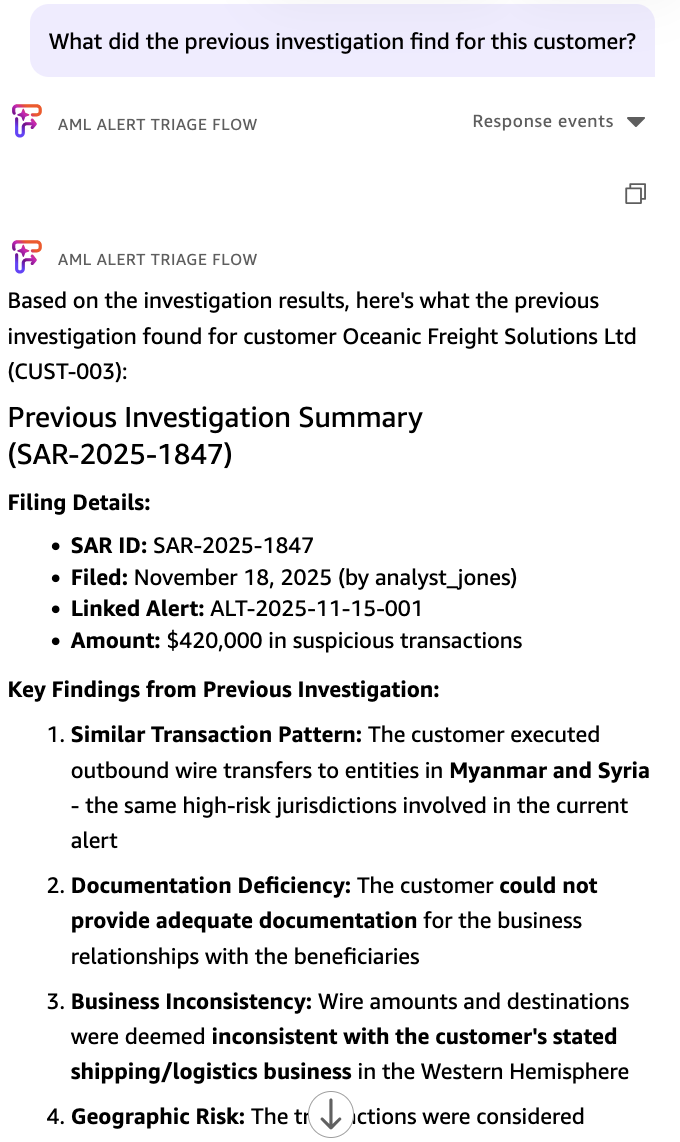
Figure 15: Response from Quick flow for follow-up questions
Security and governance considerations
Before sharing the flow with your compliance team, there are several security and governance considerations worth addressing.
On the access control side, the MCP integration runs with the permissions of the OAuth-authenticated role (AML_MCP_ROLE). Scope this role to the minimum USAGE and SELECT privileges on the MCP server, agent, semantic view, and search service, and avoid granting SYSADMIN or ACCOUNTADMIN.
Cortex AI processes data within the Snowflake security boundary, meaning your data does not leave your Snowflake account. Confirm that your Snowflake region meets your institution’s data residency requirements for regulated financial data.
In many jurisdictions, AML investigation data is subject to tipping-off restrictions. Share the Quick Flow only with authorized compliance personnel, and do not publish it to organization-wide flow libraries or expose it to customer-facing roles.
From an audit perspective, Amazon Quick logs MCP tool invocations and flow executions, while Snowflake’s ACCESS_HISTORY and ACCOUNT_USAGE views log every query executed by the Cortex Agent. Together, these provide an investigation audit trail for examiner review, with each flow run representing a discrete, traceable event.
The flow produces a draft investigation brief and disposition recommendation, but a human compliance analyst must review and approve every SAR filing or case closure. The flow is an investigation accelerator, not an automated decision maker.
Document which LLM model the Cortex Agent uses, version it in your model inventory, and include it in your institution’s AI/ML model risk management framework in accordance with SR 11-7 / OCC 2011-12.
Rotate Snowflake OAuth credentials according to your organization’s key rotation policy and set refresh token validity to the shortest window that supports your operational needs.
As your investigation methodology evolves, update the flow and republish. Quick Flows supports iterative refinement, and analysts automatically receive the latest version.
Why Quick Flows over a chat agent
Quick Flows enforces the same investigation steps every time. That is the core design decision behind this solution. Where a chat agent follows prompt instructions loosely and produces variable output depending on how each analyst phrases their request, a flow facilitates deterministic results: every alert runs through the same structured input, the same reasoning logic, and the same formatted output, regardless of who triggers it.
That consistency is what makes the investigation brief audit-ready by default. Each flow run is a discrete, logged event. The conditional branching in reasoning groups, which routes CRITICAL alerts through enhanced steps and escalates prior-SAR customers automatically, enforces logic that a chat agent cannot replicate reliably. For ad-hoc questions outside the triage workflow, the same Snowflake MCP integration works equally well with a Quick chat agent. Quick Flows and chat agents share the same foundation. They are simply different interfaces for different use cases.
Clean up resources
If you built this solution as a prototype, remove the following resources to avoid ongoing exposure and charges:
- In Amazon Quick, delete or unpublish the AML Alert Triage flow.
- In Amazon Quick, delete the integration to Snowflake MCP Server.
- In Snowflake, drop the
MCP SERVERobject if you no longer need to expose tools externally. - In Snowflake, disable or drop the
SECURITY INTEGRATIONused for OAuth. - In Snowflake, drop the Cortex Agent, Cortex Search service, and test data tables if decommissioning the workflow.
Conclusion
In this post, we showed you how to build a daily AML alert triage workflow using Amazon Quick Flows that connects to a Snowflake Cortex Agent through a Snowflake-managed MCP server. From a structured input step, the flow calls the Cortex Agent through MCP to orchestrate Cortex Analyst (for structured transaction and customer data) and Cortex Search (for BSA/AML policy and prior investigation notes), then presents a full investigation brief with a risk score and disposition recommendation.
Unlike chat agents where output varies with prompt phrasing, Quick Flows enforces predictable, repeatable sequences with built-in input validation, reasoning logic, and formatted output. This lets analysts run consistent, high-quality triage without learning prompt engineering and distribute workflows to entire teams in one click. Every analyst runs the same structured triage. The output format is predictable, and each run is a discrete, auditable event. At the same time, the agentic runtime in Quick Flows lets analysts chat with the workflow to refine outputs and ask follow-up questions, combining the rigor of a structured process with the flexibility of a conversational interface.
The key pattern here is to publish the Cortex Agent as an MCP tool through a Snowflake-managed MCP server and connect to it from Amazon Quick with OAuth. This same MCP integration works across Quick Flows, chat agents, and Amazon Quick Automate, so you can start with a structured flow for daily triage and expand to ad-hoc chat agents or enterprise-scale automations as your needs grow.
To get started, see Using Amazon Quick Flows, MCP integration, Snowflake-managed MCP server, and the Amazon Quick User Guide. For more information about Amazon Quick features and capabilities, see the Amazon Quick documentation and follow us in the Amazon Quick community.
About the authors


